
Excel As A Web Authoring Tool
Embedding a Range of Any Excel Workbook in a Web Page or Blog Post
Back in February of 2011, I was in Redmond for my annual pilgrimage to Microsoft. This is always a great trip, because I get to provide feedback to the people who actually are building the next version of Excel. Plus, I get to catch up with many friends from the Excel MVP community. On this trip, I was able to use a new feature that is available to you now.
The Development Cycle - Usually
Think about the last releases of Excel for Windows. There were versions in 1997, 2000, 2002, 2003, 2007, and 2010. Six versions from 1996 to 2011 means one version every 2.5 years on average. Excel is a very mature product, which means that there is an enormous code base. If you want to make a small change in one part of Excel, you have to make sure that you don't break something in another part of Excel. It is a massive project to come out with a new release, hence the 2-3 year development cycle.
The Development Cycle - Faster
It was interesting to see how quickly the PowerPivot team is coming along on version 2.0 of PowerPivot. After all, they are a new product, small code base, so it is easy to add features quickly. The PowerPivot team showed us some cool features that will be out later this year.
The Development Cycle - Really Faster
However, the record for releases is the Excel Web App team. Since the product initially released in the summer of 2010, they've been releasing new features every four months. The Excel Web team showed us a very cool feature that was released a few months ago. I was pretty embarrassed that this cool feature was out, people were using it, and I wasn't even aware of the feature. In this article, I will introduce the feature, show you how to use it, and announce a MrExcel.com contest to encourage you to give it a try.
Background: What is the Excel Web App?
The Excel Web app was introduced in Excel 2010. Anyone with a free account at Skydrive.Live.com could save their Excel files to a server on the Internet. You could view the Excel file on the web. Even better, you can edit the Excel file on the web, even if you have a computer that doesn't have Excel [I know, when would THAT ever happen??? Perhaps if you were visiting your grandmother...]. The version 1.0 release feels remarkably like Excel. You can use most formulas. You can display charts. You can use slicers and pivot tables (although you can not create a new pivot table in the Excel web app).
My take on the Excel web app when it was released:
- It feels remarkably like Excel
- I don't have to carry USB drives back and forth to work anymore (which means I will never be stung by forgetting the USB drive in the computer at work!)
- They scored a win by actually allowing multiple people to edit the same worksheet at the same time
- I envisioned some nice dashboard apps
- All in all, a good competitor to that online spreadsheet from G****e.
Using Excel to Create an Online Calculator in Your Blog or Web Page
I've seen the Excel web app a few times before and the usual spiel was that the real Excel does a bunch of things and that Excel Web App does many of those things. This year, however, the story was a little different. They showed a Venn Diagram where the Excel Web App did things that regular Excel can not do. In the next hour, a room full of Excel MVP's created their own apps that could be embedded in a blog post.
I have two examples that you can check out.
The first is a simple loan calculator. Enter the principal, term, and rate. Formulas show the monthly payment and a chart updates to show the breakout between principal and interest. Check this example out here: Loan Calculator Created in 30 Minutes in a Breakout Session at Microsoft (aka my Hello World app).
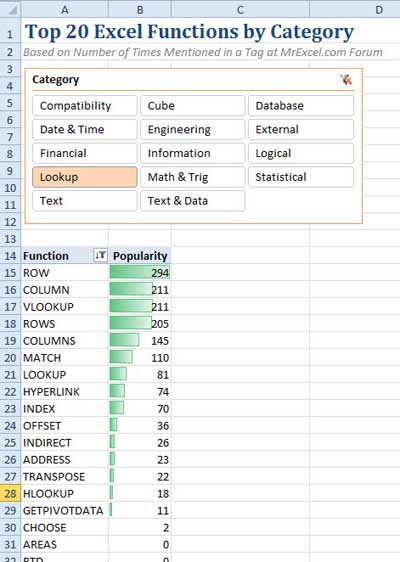
The second is a table that shows you the most popular Excel functions. This example includes a pivot table with a slicer and some conditional formatting for data visualization. You can click the slicer and the pivot table updates. See Most Popular Excel Functions.
The promise here is that you can use your Excel know-how, upload the Excel file to your skydrive account, share the file, and then get five lines of HTML code that you can embed in your blog post.
How to Create Your Own Embedded Excel App
Step 1: Design an Excel file on your computer. As you design the file, consider putting the input and output range in adjacent areas of the worksheet. If you can fit everything into 600 pixels wide, it will fit into the average web page without scrollbars. You can have other calculations, lookup tables, or pivot table data sources outside of the publish range.
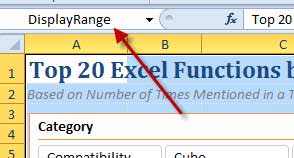
Step 2: Create a Named Range for the area that you want to show in your web page. This isn't required, but it will help you to specify the publish range of the worksheet. One easy way to name a range:
- Select the range
- Click in the Name box to the left of the formula bar
- Type a one-word name and press Enter
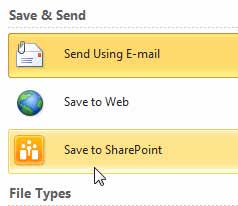
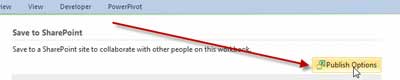
Step 3: Find the Publish Options dialog box. It is currently hard to find. In Excel 2010, open the File Menu. From the left navigation, choose Save and Send.
On the right side of Save and Send, click the Send to SharePoint button. NOTE: You will not be sending anything to SharePoint. You don't need SharePoint. It just so happens that an important setting is hidden in a dialog behind this button.
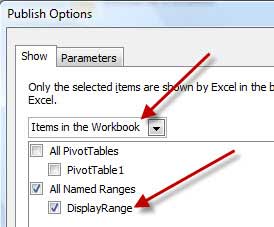
Step 4: Select Your Named Range in the Publish Options dialog
In the Publish Options dialog, open the dropdown and choose Items in the Workbook. You can then choose the named range that you set up in Step 3.
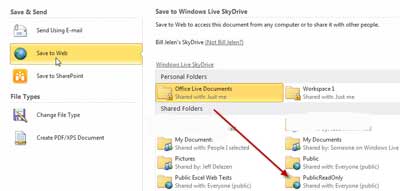
Step 5: Upload the File to the SkyDrive
At this point, you need to have a free account on Skydrive.Live.Com. If you don't have one, go out and create an account.
If you have Excel 2010, you can use the Save to Web button right in Excel 2010. Choose File, Save and Send, Save to Web. You will have to enter your SkyDrive credentials and choose a folder and file name
Otherwise, you need to go to your SkyDrive and choose to Upload a File to the SkyDrive. You can then browse to the Excel file on your computer and upload it.
Step 6: Sign into SkyDrive.Live.com and find your file.
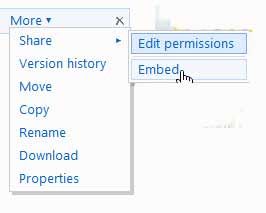
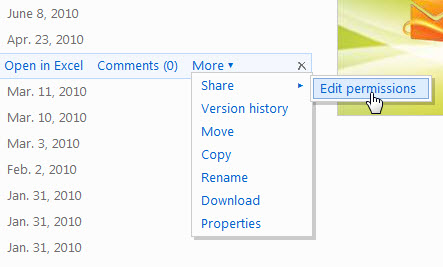
Step 7: Share the file.
To the right of the file, there is a dropdown called More. Open that dropdown. Choose Edit Permissions to Share and share the file.

Step 8: Generate the Embed Code
Go back to that More dropdown. Choose More, Share, Embed.
You now have a textbox with the Embed code. Note that the "Copy" hyperlink is above the text box, on the left. The first time I was on this page, I did not notice the Copy hyperlink, since I was looking for it below the textbox.
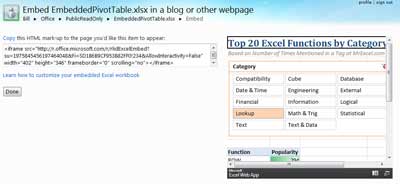
There is also a link below the text box with some tips on changing the embed code. This is a very good page to read. I will run through some of the documented (and some of the undocumented) items below.
Note that to embed a worksheet, you have to share the file. Hover over the file in the skydrive, choose More, Share, Edit Permissions to share the file.
Here is the code originally generated for my workbook:
"http://r.office.microsoft.com/r/rlidExcelEmbed?su=1975845456197464048&Fi=SD1B6B9CF953B82FF0!234&AllowInteractivity=False" width="402" height="346" frameborder="0" scrolling="no"
This default code does not allow interactivity or typing. You will most likely want to adjust the code.
Allow Interactivity
Allowing interactivity allows someone to interact with pivot table slicers or to select cells in your embedded worksheet. Simply change the &AllowInteractivity=False to &AllowInteractivity=True or even AllowInteractivity=1.
"http://r.office.microsoft.com/r/rlidExcelEmbed?su=1975845456197464048&Fi=SD1B6B9CF953B82FF0!234&AllowInteractivity=True" width="402" height="346" frameborder="0" scrolling="no"
Allow Typing
If you've created a worksheet where someone needs to type in some input values in order to display a calculation, then you will want to allow them to type in your worksheet.
Note that you can not prevent someone from typing over the formulas in your worksheet. (Cell protection is one of those things that does not work in the Excel Web App). However...the good news is that people are working on a copy of your workbook. If person A would accidentally wipe out your formulas, they could refresh the web page to get a fresh copy of your original workbook. Also, any changes made by one person will never been seen by any other visitors to your site.
To allow typing, add this code:
&AllowInteractivity=True&AllowTyping=True
Display a Specific Named Range
This is not necessary if you already specified the named range in the Publish Options dialog below. However, it might be useful if you want to show different portions of the worksheet in different versions of your web page.
&Item=ScoreChart&AllowInteractivity=False
We tried displaying RangeA at the top of a web page and RangeB later in the web page. Changes to RangeA will not show up in RangeB, because you actually end up embedding two different copies of your workbook in the web page. This would be a cool enhancement, and perhaps Microsoft would add it some day.
Specify an Active Cell
The cell pointer appears as a box around the activecell. This can be distracting. Choose a cell where the box won't be too distracting. if you have a workbook where the reader is supposed to input something, you can specify the active cell by adding this to the iFrame code:
&ActiveCell=Sheet2!A1
If your sheet name includes a space, use apostrophes:
&ActiveCell=’Income Stmt’!A1
Change the size of the frame
If your range is wider than the pixels specified, you will get scroll bars. To prevent the scrollbars, increase the values here: width="400" height="600".
Test the Code In a Draft Post at Your Blog
Take the resulting code and test it in a draft post at your blog or web page. You definitely want to use the HTML view in your blog software when pasting the code in. At WordPress, the page did not work correctly with this code:
"http://r.office.microsoft.com/r/rlidExcelEmbed?su=1975845456197464048&Fi=SD1B6B9CF953B82FF0!234&AllowInteractivity=True" width="402" height="600" frameborder="0" scrolling="no"
It was determined that some of the ampersands were causing problems, so the team changed the ampersand to
&
"http://r.office.microsoft.com/r/rlidExcelEmbed?su=-6532282880956224217&Fi=SDA558AB544C3D2D27!147&AllowInteractivity=True &AllowTyping=True&activecell=Sheet1!C6"width="402" height="450" frameborder="0" scrolling="no"
Note for WordPress: Don't be surprised in the HTML view if iframe is replaced with OFFICE. WordPress does this automatically.
[office src="http://r.office.microsoft.com/r/rlidExcelEmbed?su=1975845456197464048&Fi=SD1B6B9CF953B82FF0!234&AllowInteractivity=True" width="402" height="600"]
Be Careful If You Need to E-Mail The Code to Your Web Guy
Another note...if you are sending the code to someone to paste into their blog, you should use Notepad. I tried pasting the code into a plain text e-mail, and by the time it arrived, my e-mail client or their e-mail client had screwed up the code. Open a notepad window, paste the code in notepad, save as a text file, then attach the text file to your e-mail.
Results
The Winners Of This Challenge Are [in order of winning entry]:
- Claude Van Horn: http://vans-page.blogspot.com/
- Krishnasamy Mohan: http://www.smart-lotto-system.com/
- Michael Myett
-
Mike "ExcelisFun" Girvin:
http://people.highline.edu/mgirvin/AllClasses/135M/135/Busn135Grader.htm
and
http://people.highline.edu/mgirvin/AllClasses/216_2003/216/Busn216Grader.htm