
Excel 97 introduced new User Forms. In English, teach me how to create and use a list box.
January 17, 1999
Mr. Excel recently completed a custom application for one of our readers. In this Excel App, the user would enter 150 data points for a specific part number on sheet 1. At the click of a button, this part number and the associated data values are committed to a database on Sheet2. This was fine, but then we needed a way for the user to call up a record from sheet 2 so they could review the entries. I wanted to allow the user to open a form with a drop-down box showing all of the items on sheet 2. The user could scroll through, pick an item, and then I would pull those values from sheet 2 up to sheet 1.
Like many of you, I started writing Excel macros in Excel 5.0. This whole Macro Editor in Excel 97 is a bit intimidating. For this week's tip, I will show you, step by step, how to create the list box for this project. The focus this week is just on the combo box. The target audience is someone who knows the basics of Excel macros, but who has never used a form to interact with a macro.
First step: I changed the existing macros so that when they added a record to sheet2, the macro would name the range containing the part numbers to be named "PartList". There is a heading in cell A1, with the first item in cell A2. I used the End command to find the last row:
LastRow = Range("A6000").End(xlUp).Row
ActiveWorkbook.Names.Add Name:="PartList", RefersTo:="=Sheet2!$A$2:$A$" & LastRow
Second step: Layout the list box form. Follow these steps:
- Start the Visual Basic Editor by hitting alt-F11
- From the menu, select Insert>User Form. The editor should give you a blank UserForm1.
- If you do not see the Properties-UserForm1 box in the lower-left corner, hit the "Properties Window" icon - it looks like a hand with a finger pointing to a white sheet.
- The 4th entry in the properties window is Caption. Right now, the Caption will be UserForm1. Click the box to the right of the Caption in the Properties window and type a new title for the form. I called mine "Select a Part Number to Review". I left all of the other properties for the form in their default state.
- Click anywhere inside the userform again and the Controls Toolbox will appear.
- In the Controls toolbox, pick the letter A. Click and drag to create a label box at the top of the form. It defaults to have a caption of Label1. Click inside of the text box again and you can edit the caption. Put instructions to the user here: "Pick an item from the list below and click OK to review the values".
-
Click on the form, but outside of the label box and you will see the control toolbox again. The 4th item in the top row is a combo box tool. Click this and drag in the userform to create a combo box. This is where the list of part numbers will appear. The default name is ComboBox1.
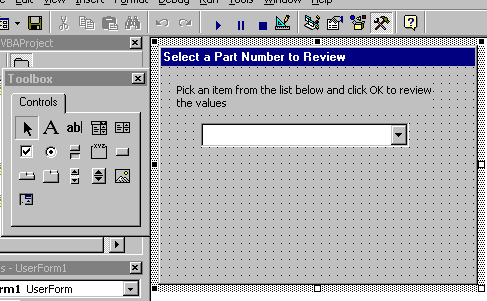
Control toolbox -
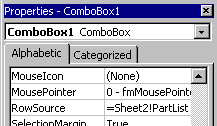
The properties window will now be showing you the properties for ComboBox1. Scroll down through the properties until you see the RowSource property. For the RowSource property, type =Sheet2!PartList
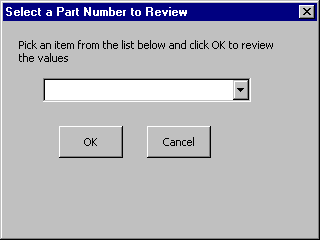
Combobox properties - You can now run a quick test to make sure things are working properly. Click the title bar of your user form to select the entire form. Now click the "play" icon (it looks like the play button on your VCR). You will be returned to your Excel workbook and have our simple userform. If you click the part number dropdown, you should see a list of valid part numbers. Pick one, and it will stay in the combo box. So far, not too exciting. Click the little X in the upper right corner to dismiss the box.
- Return to the Visual Basic editor. Click the user form to show the Control Toolbox. Click the CommandButton tool and draw a button. Change the caption to be OK using the Properties - CommandButton1 window.
- Draw a second button and label it Cancel.
-
We are almost done. Let's tie a little bit of code to the Cancel button. Right-click the Cancel button and select "View Code". The Editor will set up your Sub and End Sub statements. Between them, type one line of code:
UserForm1.HideYes, that is all there is to assigning code to a button. To get back to the userform, double-click the words UserForm1 in the Project Window. (Can't see the project window? Hit the Project Explorer icon, just to the left of the Properties icon.)
-
To finish userform1, let's do something with the OK button. When the user clicks OK, I want the value from the list box to appear in sheet1 cell A2, and then I want to kick off a macro I had previously written called ReviewItem. Right-click the OK button and select View Code. Enter this code:
Private Sub CommandButton1_Click()
		Worksheets("Sheet1").Range("A2") = UserForm1.ComboBox1.Value
		UserForm1.Hide
		ReviewItem
End Sub
Congratulations! You have finished your first user form. To make the form appear, run a macro which has this line:
UserForm1.ShowThe form will look something like this: