
Lay Out Your Garden in Excel
April 18, 2005
When you were in math class, did you ever have to make drawings on graph paper? I remember drawing a drawing of my home to scale using the paper that had a light blue grid on the white paper. Each box on the graph paper would represent a half meter in real life.
If you think about Excel, it is really the world's largest sheet of graph paper. However, the initial problem is that each box is actually a rectangle instead of being perfectly square.

If you could make the cells perfectly square, then you could use Excel's border tools to make scale drawings. In Excel 2002 and newer, it is easy to set all of the boxes to the same height and width.
First, select all cells by clicking the mouse in the box to the left of column A and above Row 1.

Click in the row labels, between row 1 and row 2. When you click, a tooltip appears to tell you that your Row 1 is 17 pixels tall. You should really do this step on your computer, because the height of the row depends on your default font. Since I changed my default font from Arial to Times New Roman, my row height might start off differently than yours.
Next, grab the line between the "A" and "B" above the first two columns. Drag it to the left. As you drag, the tooltip will show the width of the column. When you get to 17 pixels, release the mouse button.

When you release the mouse button, all of the columns will be resized to 17 pixels. You now have a virtual sheet of graphpaper that is 256 boxes wide by 65,536 boxes tall!

Note
In July 2006, Michael Pemberton wrote in with a macro that he uses to replicate the above steps. Check out the macro here.
Measure your garden and decide on a scale. I would like to plan a flower bed in front of my house. The bed is 2 meters deep and 15 meters long. If I use the scale of 2 boxes per meter, then my flower bed would take up 4 columns by 30 rows. Select a range that is 4 rows tall by 30 columns wide.

Look for the Borders dropdown in the Formatting toolbar. It normally looks like this.

If you select the dropdown arrow next to the icon, you can choose from 12 popular border styles. Select the Thick Box Border to outline your garden on the graph paper.

Or, if you want more flexibility than the 12 common styles, use Format - Cells and choose the Borders tab in the Format Cells dialog. This dialog allows you to change the color of the borders and offers a variety of line thickness.

If you want to draw sections of the garden, use the Drawing toolbar. Display the drawing toolbar by selecting View - Toolbars - Drawing from the menu. This icon is the textbox icon. A textbox can be any rectangular shape and include words on the shape.

Select the icon and drag to draw an area for hedges in your garden.

Notice that the textbox above is surrounded by diagonal lines. When you have diagonal lines, you can edit the text in the textbox. Type the word Hedges.

In order to have complete access to formatting options for the textbox, you need to take the textbox out of text edit mode. You can either left-click on the diagonal lines, or Ctrl+click in the text box. The diagonal lines will change to dots. Right-click on the dots and choose Format Text Box. On the Colors and Lines tab, choose a green fill.

On the Alignment tab, choose Center.

On the font tab, change the font color to white.

Use Insert - Picture - ClipArt and select Clips Online to search for flower clipart from Microsoft. Download some clipart and insert it in your garden. Clipart can be easily resized to fit. Select the clipart by left-clicking it. Grab the lower right resize handle with your mouse. Hold down the shift key while moving the resize handle to size the clipart without changing the aspect ratio.
After adding some clipart, you will have a plan for your garden.
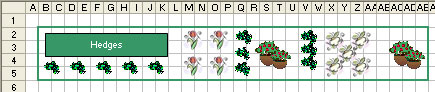
This concept of using Excel for drawing has many applications.