Creating Email based on Data in a Specific row

NorthbyNorthwest

Board Regular
Joined
Oct 27, 2013
Messages
154
Office Version
  1. 365
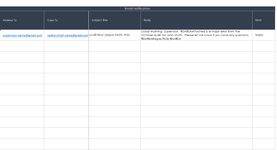
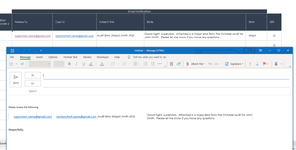
Hope someone can help. I have a workbook I assign each month to auditors in my unit. The workbook has a worksheet with a table of between 100 - 150 rows and 52 columns. Each row contains an audit item. The columns across table contains data related to each audit and cells the auditor completes. I'd like for auditors to send an email to an employee's supervisor if error found. So, the auditor would be manually triggering the email code (by a keyboard shortcut, or event, or button). The email would be copied to a couple others. The subject line would include error type, employee's surname, and audit ID number. The body contains a very brief message. This information is in columns 44 to 47 of audit row. I have attached a copy to this post. I'd like auditors to be able to generate/create an email by pulling the email particulars from audit row (could be any row) and columns 44 to 47 (to addressee, copy to addressees, subject line, and email body. I started out trying to use the mailto: hyperlink function to accomplish this by formula. But failed. I think problem was the 255 character limitation. I been researching online for a VBA solution. But everything I come up with relates to sending mass emails or attaching parts of workbook. Not what I'm trying to do. I'm trying to create an email based on data in four cells in a row if needed. The key that I can't seem to wrap head around how to identify the audit row. The columns are always the same. Should auditor select the cells? Should I tie email to double click event? But I still can't figure out how where to start or end with code. I've created emails generated from Excel before, but I was always entering email particulars in the code.

Any help would be greatly appreciated. I've been at this for a month.
 

Attachments

  • Audit worksheet.png
    Audit worksheet.png
    20.2 KB · Views: 13
  • Audit worksheet.png
    Audit worksheet.png
    20.2 KB · Views: 13

Excel Facts

What do {} around a formula in the formula bar mean?
{Formula} means the formula was entered using Ctrl+Shift+Enter signifying an old-style array formula.
.
The following will allow the user to select the cells they want displayed in the body of the email. The user will
highlight the cells first, then click the button.

Use this as a base to build upon for your stated needs :

VBA Code:
Option Explicit

Sub sendmail()
   Dim OutApp       As Object
   Dim OutMail      As Object
   Dim SigString    As String
   Dim Signature, EmailTo, CCto, Subj, msg, Filepath As String
   Dim ws           As Worksheet
   Dim cel          As Range
   Dim LR           As Long
   Dim rng As Range
  
   Set ws = Sheets("Sheet1")
   Set rng = Selection   '<-- Set the sheet and range to be copied into body of email.
 
   Set OutApp = CreateObject("Outlook.Application")
   Set OutMail = OutApp.CreateItem(0)
  
   With ws
    With Application
       .EnableEvents = False
       .ScreenUpdating = False
    End With
                
                Set OutApp = CreateObject("Outlook.Application")
                Set OutMail = OutApp.CreateItem(0)
    
                With OutMail
                   .To = ws.Range("A1").Value
                   .CC = ""
                   .BCC = ""
                   .Subject = Subj
                   .HTMLBody = msg & "<br><br>" & "Please review the following : " & RangetoHTML(rng)
                   .Display   '.Send   'or use .Display
                End With
            
   End With

   On Error GoTo 0
   Set OutMail = Nothing
   Set OutApp = Nothing

   With Application
      .EnableEvents = True
      .ScreenUpdating = True
   End With
  
End Sub

Function RangetoHTML(rng As Range)
    Dim fso As Object
    Dim ts As Object
    Dim TempFile As String
    Dim TempWB As Workbook
    TempFile = Environ$("temp") & "/" & Format(Now, "dd-mm-yy h-mm-ss") & ".htm"
    
    'Copy the range and create a new workbook to past the data in
    rng.Copy
    
    Set TempWB = Workbooks.Add(1)
    
    With TempWB.Sheets(1)
        .Cells(1).PasteSpecial Paste:=8
        .Cells(1).PasteSpecial xlPasteValues, , False, False
        .Cells(1).PasteSpecial xlPasteFormats, , False, False
        .Cells(1).Select
        Application.CutCopyMode = False
        
        On Error Resume Next
        .DrawingObjects.Visible = True
        .DrawingObjects.Delete
        On Error GoTo 0
    End With
    
    'Publish the sheet to a htm file
    With TempWB.PublishObjects.Add( _
         SourceType:=xlSourceRange, _
         Filename:=TempFile, _
         Sheet:=TempWB.Sheets(1).Name, _
         Source:=TempWB.Sheets(1).UsedRange.Address, _
         HtmlType:=xlHtmlStatic)
        .Publish (True)
    End With
    
    'Read all data from the htm file into RangetoHTML
    Set fso = CreateObject("Scripting.FileSystemObject")
    Set ts = fso.GetFile(TempFile).OpenAsTextStream(1, -2)
    
    RangetoHTML = ts.ReadAll
    
    ts.Close
    
    RangetoHTML = Replace(RangetoHTML, "align=center x:publishsource=", _
                          "align=left x:publishsource=")
    'Close TempWB
    TempWB.Close savechanges:=False
    'Delete the htm file we used in this function
    Kill TempFile
    Set ts = Nothing
    Set fso = Nothing
    Set TempWB = Nothing
End Function
 
Upvote 0
Solution
.
The following will allow the user to select the cells they want displayed in the body of the email. The user will
highlight the cells first, then click the button.

Use this as a base to build upon for your stated needs :

VBA Code:
Option Explicit

Sub sendmail()
   Dim OutApp       As Object
   Dim OutMail      As Object
   Dim SigString    As String
   Dim Signature, EmailTo, CCto, Subj, msg, Filepath As String
   Dim ws           As Worksheet
   Dim cel          As Range
   Dim LR           As Long
   Dim rng As Range
 
   Set ws = Sheets("Sheet1")
   Set rng = Selection   '<-- Set the sheet and range to be copied into body of email.

   Set OutApp = CreateObject("Outlook.Application")
   Set OutMail = OutApp.CreateItem(0)
 
   With ws
    With Application
       .EnableEvents = False
       .ScreenUpdating = False
    End With
               
                Set OutApp = CreateObject("Outlook.Application")
                Set OutMail = OutApp.CreateItem(0)
   
                With OutMail
                   .To = ws.Range("A1").Value
                   .CC = ""
                   .BCC = ""
                   .Subject = Subj
                   .HTMLBody = msg & "<br><br>" & "Please review the following : " & RangetoHTML(rng)
                   .Display   '.Send   'or use .Display
                End With
           
   End With

   On Error GoTo 0
   Set OutMail = Nothing
   Set OutApp = Nothing

   With Application
      .EnableEvents = True
      .ScreenUpdating = True
   End With
 
End Sub

Function RangetoHTML(rng As Range)
    Dim fso As Object
    Dim ts As Object
    Dim TempFile As String
    Dim TempWB As Workbook
    TempFile = Environ$("temp") & "/" & Format(Now, "dd-mm-yy h-mm-ss") & ".htm"
   
    'Copy the range and create a new workbook to past the data in
    rng.Copy
   
    Set TempWB = Workbooks.Add(1)
   
    With TempWB.Sheets(1)
        .Cells(1).PasteSpecial Paste:=8
        .Cells(1).PasteSpecial xlPasteValues, , False, False
        .Cells(1).PasteSpecial xlPasteFormats, , False, False
        .Cells(1).Select
        Application.CutCopyMode = False
       
        On Error Resume Next
        .DrawingObjects.Visible = True
        .DrawingObjects.Delete
        On Error GoTo 0
    End With
   
    'Publish the sheet to a htm file
    With TempWB.PublishObjects.Add( _
         SourceType:=xlSourceRange, _
         Filename:=TempFile, _
         Sheet:=TempWB.Sheets(1).Name, _
         Source:=TempWB.Sheets(1).UsedRange.Address, _
         HtmlType:=xlHtmlStatic)
        .Publish (True)
    End With
   
    'Read all data from the htm file into RangetoHTML
    Set fso = CreateObject("Scripting.FileSystemObject")
    Set ts = fso.GetFile(TempFile).OpenAsTextStream(1, -2)
   
    RangetoHTML = ts.ReadAll
   
    ts.Close
   
    RangetoHTML = Replace(RangetoHTML, "align=center x:publishsource=", _
                          "align=left x:publishsource=")
    'Close TempWB
    TempWB.Close savechanges:=False
    'Delete the htm file we used in this function
    Kill TempFile
    Set ts = Nothing
    Set fso = Nothing
    Set TempWB = Nothing
End Function
 
Upvote 0
Hi, Logit. First thanks so very much for responding to my SOS. I was able to understand the sub routine and run code. I was amazed. A couple of questions:

I think code pastes the cell itself in email body. I can see borders of cell(s). I was hoping to copy only the contents so that text span width of email body. How do I accomplish this?

When I selected columns AR thru AU, all the cells appeared in html body. I only wanted column AU as body. Is it possible to get column AR to pass string contents to the "To" in email, column AS to pass string contents to the "Cc" in email, column AT to pass string contents to the subject in email?

I am attaching screen shots of Excel table and the email generated by the code.
 

Attachments

  • Audit Email Try (002).png
    Audit Email Try (002).png
    43.1 KB · Views: 18
Upvote 0

Forum statistics

Threads
1,214,812
Messages
6,121,699
Members
449,048
Latest member
81jamesacct

We've detected that you are using an adblocker.

We have a great community of people providing Excel help here, but the hosting costs are enormous. You can help keep this site running by allowing ads on MrExcel.com.
Allow Ads at MrExcel

Which adblocker are you using?

Disable AdBlock

Follow these easy steps to disable AdBlock

1)Click on the icon in the browser’s toolbar.
2)Click on the icon in the browser’s toolbar.
2)Click on the "Pause on this site" option.
Go back

Disable AdBlock Plus

Follow these easy steps to disable AdBlock Plus

1)Click on the icon in the browser’s toolbar.
2)Click on the toggle to disable it for "mrexcel.com".
Go back

Disable uBlock Origin

Follow these easy steps to disable uBlock Origin

1)Click on the icon in the browser’s toolbar.
2)Click on the "Power" button.
3)Click on the "Refresh" button.
Go back

Disable uBlock

Follow these easy steps to disable uBlock

1)Click on the icon in the browser’s toolbar.
2)Click on the "Power" button.
3)Click on the "Refresh" button.
Go back
Back
Top