Excel Spreadsheet to Webpage low pixelation, Not sure if that is correct.

AJW1100

Board Regular
Joined
May 17, 2010
Messages
59
Office Version
  1. 2010
Platform
  1. Windows
Okay, our bowls club has a website but our webmaster died of cancer a few weeks ago. Somehow I have ended up with updating the web site. I have NEVER done anything like this before so it is a vertical learning curve.
The website is WordPress and edited in Elementor. After many hours of trial and keeping my fingers crossed I have managed some text updating (Line spacing and alignment content in column control is a nightmare) I digress.
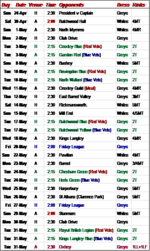
I need to publish on the website a list of games we are due to play, I have copied the Excel spreadsheet and managed t save it as a png photo. However the text is very poor and seems to be of low pixelation or size? Properties are 45.5 KB (46,662 bytes) on the image which I hope I can upload here.
I am not sure where to go from here, The website has the list but it is last years (Why we need to get it up to date) so I need to upload a new and readable photo. I have not found a way to upload text it only seems to allow photos.
Please bear in mind I have only learnt a little on YouTube about Elementor and what I have learnt by trial and error. Luckily I have not crashed it, yet.... I am an OAP and am Not very techie.

I guess I will get the hang of it but in the meantime could do with some help.
 

Attachments

  • Web Games Apr May 200.png
    Web Games Apr May 200.png
    45.6 KB · Views: 13

Excel Facts

Last used cell?
Press Ctrl+End to move to what Excel thinks is the last used cell.
Not sure what type of help you most need, I can suggest a way for easily create images from excel, possibly in good appearance.
This can be obtained using this Function:
Code:
Function RangeToJPG(myRan As Range, PicName As String, Optional myPath As String = "", Optional ByVal Filtr As String = "jpg") As String
    Dim pSh As Worksheet, rSh As Worksheet
'
If myPath = "" Then myPath = Environ$("temp")
PicName = PicName & "." & Filtr
Set pSh = myRan.Parent
Set rSh = ActiveSheet
Application.ScreenUpdating = False
Application.EnableEvents = False
    On Error Resume Next
    pSh.Activate
'kill the file to create:
    On Error Resume Next
        Kill myPath & Application.PathSeparator & PicName
    On Error GoTo 0
    Application.Wait (Now + TimeValue("0:00:01"))
'Copy range...
    myRan.CopyPicture xlScreen, xlPicture
'...and export
    With pSh.ChartObjects.Add(myRan.Left, myRan.Top, myRan.Width, myRan.Height)
        .Activate
        .Chart.Paste
        .Chart.Export Filename:=myPath & Application.PathSeparator & PicName, fIltername:=Filtr
    End With
    pSh.ChartObjects(pSh.ChartObjects.Count).Delete
'return Path & Name:
    RangeToJPG = myPath & Application.PathSeparator & PicName
    rSh.Activate
Application.EnableEvents = True
Application.ScreenUpdating = True
End Function

Put the code in a standard module of your vba project, then you can create snapshot of excel ranges by calling the function. For example:
Code:
Sub MakePics()
'
PicName1 = RangeToJPG(Sheets("Foglio2").Range("E1:H4"), "myPicture1", "c:\prova", "png")
PicName2 = RangeToJPG(Sheets("Foglio4").Range("A1:D15"), "myPicture2", "c:\prova", "png")
End Sub
This code will create in the directory C:\PROVA a myPicture1.png and a myPicture2.png from those ranges in those sheets.
Variables PicName1 and PicName2 will contain the full Path & Name for the images created

The call syntax for the function is:
CreatedName = RangeToJPG(Sheet(NameOfTheSheet).Range(TheInterval), NameForThePicture, Optional: DestinationPath, Optional:PictType)
If DestinationPath is omitted or a null string then the user temp directory will be used
If PictType is omitted then JPG will be used

Remember that if you wish to insert PictType then DestinationPath cannot be omitted, but can be skipped.
Examples:
Code:
PicName1 = RangeToJPG(Sheets("Foglio2").Range("E1:H4"), "myPicture1",  , "png")        'Correct (Temp will be used)    
PicName1 = RangeToJPG(Sheets("Foglio2").Range("E1:H4"), "myPicture1", "", "png")             'Correct (temp will be used)
PicName1 = RangeToJPG(Sheets("Foglio2").Range("E1:H4"), "myPicture1", "png")                 'WRONG 
PicName1 = RangeToJPG(Sheets("Foglio2").Range("E1:H4"), "myPicture1", "C:\PROVA")            'Correct (jpg will be used)
To create images with specific size it is good if you resize the worksheet before creating the pictures, rather than resizing the pictures later on
 
Upvote 0
Hi Anthony47.
Err, wow, don't know what to say, other than a very large thank you but this is way, way, beyond my capabilities. I was hoping for a variation of the Ctrl C and Ctrl V or maybe a change in the file format.

Sorry, but I reckon I will have to admit defeat.

Regards
Alan.
 
Upvote 0
Why giving up?
Do you need more instruction on how working with that macro (in this case I can provide more help), or do you mean that even in case you get good pictures you will not be able to update the server?
 
Upvote 0
Why giving up? What would I need? A working brain would be a good start. As much as I would like to I really do not understand this. "Put the code in a standard module of your vba project..."
I do not even understand if this refers to the Excel or the Elementor part of my problem, a standard module I assume is part of the website... and vba project is probably the website itself. I am sure your time would be better spent elsewhere. I really do appreciate your offer of help, this forum has helped me a lot in the past but in this case I feel I am well out of my depth.

Regards
Alan.
 
Upvote 0
Don't despair...
You used Excel to get a picture of a range of cells, but the quality of these pictures is poor.
What I suggested is a way for easily create images from excel, possibly in good quality, working with Excel. That's what most of us can do in a forum mainly devoted to Excel.

That is obtained using a script written in the programming language available to users: VBA (for Visual Basic for Applications). These script are normally called "macro".
While Excel formulas are inserted in the visible Worksheets, macro are inserted into "modules" that are normally not visible.

From Excel you access the "macro programming environment" typing Alt-F11 (press Alt, press the key F11; release both keyes); this will open the door to "the vba project of your Excel file"


To create the "standard vba module" just use the commands Menu /Insert /Module; a new empty page will be created, probably will be titled "Module1".
Copy both the group of code I provided in this Module

The first block is a "function" specialized to make a picture out of a specified sheet & range of cells.
The second (short) one is the code that "recalls" the function to create the picture; when we recall the function we need to specify which sheet and range, the name of the Picture to create, the Directory in which the picture will be stored, and the type of picture (eg: jpg, png, gif)
Its code:
VBA Code:
Sub MakePics()
'
PicName1 = RangeToJPG(Sheets("Foglio2").Range("E1:H4"), "myPicture1", "c:\prova", "png")        'Line 1
PicName2 = RangeToJPG(Sheets("Foglio4").Range("A1:D15"), "myPicture2", "c:\prova", "png")      'Line 2
End Sub

Line 1 create a myPicture1.png stored in the directory C:\PROVA, using Range("E1:H4") of sheets("Foglio2"); line2 does a similar job with another sheet & range.
Of course ou will use your picture names, your sheets, your ranges and your available directories

So adapt Line1 and Line2 to your example and you are almost ready

Return to excel e run the macro MakePics: the simplest method for running a macro is using the command Alt-F8; this will show you all the available macro (MakePics should be in the list), just select MakePics and press the button Run
If everything works well after this process you should find the image(s) in the declared directory

Whenever you'll need to create a picture then modify MakePics with the right parametres and run the macro. To modify a macro: from Excel press Alt-F8; select the name of the macro and press Modify. With this command you will open the vba environment and the code of the macro will be visible. Edit the code as necessary, then return to excel.

Of course you can create 1-10-100 images in a single run, if you insert 1-10-100 lines similar to Line1 or Line2 shown above.

Make a test using "a copy" of any workbook; if you succede and find this process in any way useful for you then you will move to "a copy" of your real workbook
 
Upvote 0
Thank you, I have printed off the above and will go through it when I have some spare time to 'play' with a copy of my speadsheet.

I was having a careful look at the website that has the games schedules and found that it was not a photo our web guy inserted on the page, it was an editable table. I do not think that you can edit a photo so it must have come from a 'file' of some sort..
I know he did not like anything MS related and generally only used open source programs, this makes me think he used an open source sheet to use on the page, maybe Google Sheets or similar.
 
Upvote 0
I would not want to torture you beyond my willings, but consider that Excel can also help you in creating the html code to be embedded in a web source code, using

For example, copy the following code into "a standard module of your vba project"
Code:
Sub RangePublish(ByVal mySh As String, ByVal PRan As String, OutFile As String)
'
Dim TmpFile As String, myBDT As String, PubFile
TmpFile = OutFile
'Crea file html:
With ActiveWorkbook.PublishObjects.Add(SourceType:=xlSourceRange, _
    FileName:=TmpFile, _
    Sheet:=mySh, _
    Source:=PRan, _
    HtmlType:=xlHtmlStatic)
    .Publish (True)
End With
'
Debug.Print "+++++", "Creato " & TmpFile
'
End Sub

Now with a macro like the following you will be able to create an htm file that reflects the range you specify:
Code:
Sub MakeHtm()
Call RangePublish("Sheet1", "V1:AA10", "C:\PROVA\myHTM1.htm")
Call RangePublish("Sheet2", "A1:H20", "C:\PROVA\myHTM2.htm")
Call RangePublish("Sheet1", "A1:M10", "C:\PROVA\myHTM3.htm")
End Sub
This will create the 3 files that reflect each of the specified ranges; you can open them using Notepad for inspecting them and maybe for coping part of the htm code.
 
Upvote 0
Thank you. Just so I am clear on the last post you have the following:
With ActiveWorkbook.PublishObjects.Add(SourceType:=xlSourceRange, _
FileName:=TmpFile, _
Sheet:=mySh, _
Source:=PRan, _
Should FileName:= the actual file name?
Should Sheet:= the actual sheet name ? in my case Apr~May then change sheet:= to Jun or July or Aug or Sept ?
Should Source:= the cell range or what does PRan, refer to ?

Also:
Sub MakeHtm()
Call RangePublish("Sheet1", "V1:AA10", "C:\PROVA\myHTM1.htm") Rename Sheet 1 to Apr~May
Call RangePublish("Sheet2", "A1:H20", "C:\PROVA\myHTM2.htm") Sheet 2 is Jun
Call RangePublish("Sheet1", "A1:M10", "C:\PROVA\myHTM3.htm")Sheet 1 is the same Apr~May

Lastly does the C:\PROVA\ be generated during the procedure you have suggested?

Ever had the feeling you've started something but then wished you hadn't?
I have.......:confused:

I will copy my file and rename it so I do not screw the proper file up. I am trying to find out if I can make a copy of our website to practice on, or start making a new website to practice on as I again do not want to mess that up!! The site uses wordpress and elementor.

Regards
Alan.
 
Upvote 0
No, the macro MakeHtm create the files but not the directories; ie you have to specify a directory that already exists.

Also, in the Sub RangePublish don't modify nothing; you will "pass" the appropriate parametres when you "call" the procedure, as I do in the Sub MakeHtm (I seem this is easier that modifying the PublishObjects.Add parametres)

And don't worry, I shall not haunt you more ...unless you ask! :biggrin:
Have a nice week!
 
Upvote 0

Forum statistics

Threads
1,214,650
Messages
6,120,734
Members
448,987
Latest member
marion_davis

We've detected that you are using an adblocker.

We have a great community of people providing Excel help here, but the hosting costs are enormous. You can help keep this site running by allowing ads on MrExcel.com.
Allow Ads at MrExcel

Which adblocker are you using?

Disable AdBlock

Follow these easy steps to disable AdBlock

1)Click on the icon in the browser’s toolbar.
2)Click on the icon in the browser’s toolbar.
2)Click on the "Pause on this site" option.
Go back

Disable AdBlock Plus

Follow these easy steps to disable AdBlock Plus

1)Click on the icon in the browser’s toolbar.
2)Click on the toggle to disable it for "mrexcel.com".
Go back

Disable uBlock Origin

Follow these easy steps to disable uBlock Origin

1)Click on the icon in the browser’s toolbar.
2)Click on the "Power" button.
3)Click on the "Refresh" button.
Go back

Disable uBlock

Follow these easy steps to disable uBlock

1)Click on the icon in the browser’s toolbar.
2)Click on the "Power" button.
3)Click on the "Refresh" button.
Go back
Back
Top