Export chart as image including text boxes and slider bar

Tmod700

New Member
Joined
Jan 8, 2012
Messages
8
I am trying to figure out how to export a chart as a image but include the text boxes as well as slider bar.
I successfully export the chart as a image currently but the text boxes and slider bar do not show up.
I have everything grouped so that is not the issue and I select the group and click the button and as I stated saves the chart as a image but without the text boxes and slider.
Any ideas besides copy the chart paste as image and then paste into photoshop and then crop and then finally save as the image.
My current way of saving a chart is select the chart and click export and it pastes the image in the path I wrote.

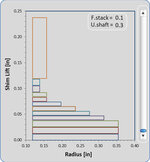
Rectangle boxed text boxes and slider bar are what do NOT show when using conventional methods.

Any ideas would be appreciated!!
 

Attachments

  • weight_force.jpg
    weight_force.jpg
    38.4 KB · Views: 14

Excel Facts

Will the fill handle fill 1, 2, 3?
Yes! Type 1 in a cell. Hold down Ctrl while you drag the fill handle.
if you change the area to the range you want to export
Set area = Sheet.Range(Sheet.PageSetup.PrintArea)
for example
Set area = Sheet.Range(range("B20:G30")
VBA Code:
Sub ExportImage()


Dim sFilePath As String
Dim sView As String

'Captures current window view
sView = ActiveWindow.View

'Sets the current view to normal so there are no "Page X" overlays on the image
ActiveWindow.View = xlNormalView

'Temporarily disable screen updating
Application.ScreenUpdating = False

Set Sheet = ActiveSheet

'Set the file path to export the image to the user's desktop
'I have to give credit to Kyle for this solution, found it here:
'http://stackoverflow.com/questions/17551238/vba-how-to-save-excel-workbook-to-desktop-regardless-of-user
sFilePath = CreateObject("WScript.Shell").specialfolders("Desktop") & "\" & ActiveSheet.Name & ".png"

'Export print area as correctly scaled PNG image, courtasy of Winand
zoom_coef = 100 / Sheet.Parent.Windows(1).Zoom
Set area = Sheet.Range(Sheet.PageSetup.PrintArea)
area.CopyPicture xlPrinter
Set chartobj = Sheet.ChartObjects.Add(0, 0, area.Width * zoom_coef, area.Height * zoom_coef)
chartobj.Chart.Paste
chartobj.Chart.Export sFilePath, "png"
chartobj.Delete

'Returns to the previous view
ActiveWindow.View = sView

'Re-enables screen updating
Application.ScreenUpdating = True

'Tells the user where the image was saved
MsgBox ("Export completed! The file can be found here:" & Chr(10) & Chr(10) & sFilePath)

End Sub
 
Upvote 0
Pro tip: if you want shapes (including textboxes) to stay with your chart, embed them in your chart. Either select the chart first, then select the drawing tool from the ribbon, or copy the drawn shapes, select the chart, and paste them. This means the shapes are part of the chart, and if you copy/paste or export the chart, the shapes go with them. Grouping does not incorporate the shapes into a chart, and grouping is unreliable in other ways. Unfortunately, you cannot embed a control of either type (form or ActiveX) in a chart, because those are not regular shapes.

Now I think a little explanation is warranted. I'm old and have a gray beard, so I'm entitled.

I don't know when it was introduced, but sometime later than Excel 2016, when you right-click on a chart, there is a Save As Picture option to save a chart as an image file. More recently (I think), Save as Picture was extended to shapes as well, including grouped shapes that might also include charts, textboxes, and controls. In the latest release of Microsoft 365, this works fine, though the resulting PNG is 3.4 times as large as if you had copied the group as a bitmap and pasted that into an image editor.

There is no VBA equivalent of Save As Picture; recording a macro shows selecting the shape but not saving it. But there is a command MyChart.Export which will export a chart. That's great if all you're exporting is a chart (including its embedded shapes), but if what you want to export is part of a worksheet or some collection of shapes, it is not sufficient. The workaround is to copy what you want to export as a bitmap, insert a blank chart that is as large as the copied bitmap, paste the copied bitmap into the blank chart, export this chart, then delete it to remove evidence of your trickery.

The code posted by BSALV uses this workaround to export a picture of a range of cells, so you would have to align your grouped chart and shapes with a cell grid, then use the routine to export a picture of the section of the grid underlying your shapes (the picture includes shapes floating above the grid).

It's not very complicated, but I don't have the bandwidth now to write the routine to handle shapes instead of a range.
 
Upvote 0
Solution
Thank you both for your replies, I tried the VBA and didn't have much luck with it so just sucked it up and pasted the text boxes in the chart while it was selected and that worked well with my button for non text box charts.
 
Upvote 0
can you add a link to your file ?
What is your excel version ?
 
Upvote 0

Forum statistics

Threads
1,214,649
Messages
6,120,733
Members
448,987
Latest member
marion_davis

We've detected that you are using an adblocker.

We have a great community of people providing Excel help here, but the hosting costs are enormous. You can help keep this site running by allowing ads on MrExcel.com.
Allow Ads at MrExcel

Which adblocker are you using?

Disable AdBlock

Follow these easy steps to disable AdBlock

1)Click on the icon in the browser’s toolbar.
2)Click on the icon in the browser’s toolbar.
2)Click on the "Pause on this site" option.
Go back

Disable AdBlock Plus

Follow these easy steps to disable AdBlock Plus

1)Click on the icon in the browser’s toolbar.
2)Click on the toggle to disable it for "mrexcel.com".
Go back

Disable uBlock Origin

Follow these easy steps to disable uBlock Origin

1)Click on the icon in the browser’s toolbar.
2)Click on the "Power" button.
3)Click on the "Refresh" button.
Go back

Disable uBlock

Follow these easy steps to disable uBlock

1)Click on the icon in the browser’s toolbar.
2)Click on the "Power" button.
3)Click on the "Refresh" button.
Go back
Back
Top