Power Query or DAX for Calendar table?

ClaireS

Board Regular
Joined
Jul 29, 2013
Messages
155
Office Version
  1. 365
Platform
  1. Windows
DAX newbie here. I see that you can create date tables for Power BI either in Power Query or in DAX. To my mind, the DAX method seems much easier (CALENDARAUTO then add extra columns as needed), but I have also seen it done in Power Query - usually either asking for StartDate and EndDate parameters or with some clever function call to extract these from the data. From my learning, I gather that generating tables and columns is best done "upstream", i.e. in Power Query, but as I say this seems more complicated.

What would be considered best practice - and why?
 

Excel Facts

Move date out one month or year
Use =EDATE(A2,1) for one month later. Use EDATE(A2,12) for one year later.
There are different approaches and views. I favour PQ
1. all data prep is in the same place
2. You can cut and paste the code and reuse again, 20 secs to create a calendar table.

if you use DAX the way you describe and there are 20 columns, it is a lot of work each time. You can do it in a DAX table function (in PBI, not Power Pivot), but I just prefer PQ for the reason in point 1.

i literally just copy the table I created here, and change the dates.
 
Upvote 0
Solution
There are different approaches and views. I favour PQ
1. all data prep is in the same place
2. You can cut and paste the code and reuse again, 20 secs to create a calendar table.

if you use DAX the way you describe and there are 20 columns, it is a lot of work each time. You can do it in a DAX table function (in PBI, not Power Pivot), but I just prefer PQ for the reason in point 1.

i literally just copy the table I created here, and change the dates.
Thank you so much. Yes, I think point 1 is the key here. Point 2 less so, because you can copy and paste DAX just as easily as PQ! I shall certainly work through your excellent article - and maybe make some of the adjustments suggested in the comments.

One interesting aside is the British tax year, which unhelpfully runs from 6th April one year to 5th April the next, so not based on an actual month end. In DAX, with CALENDARAUTO, I think I'd be limited to a fiscal year starting on 1st of the month, but with your method, I can simply adjust the offset days to 270 instead of 184...

Off to have a play now!
 
Upvote 0
"Point 2 less so, because you can copy and paste DAX just as easily as PQ", not really, not if you do it the way you described. If you do it with calculated columns, you will have to cut and paste 1 column at a time x the number of columns. 20 columns in total = 19 separate cut and paste events, in order, waiting for each to calc before moving to the next. In PQ, its a single cut and paste.
Not if you do it all with ADDCOLUMNS around the original CALENDARAUTO :cool:
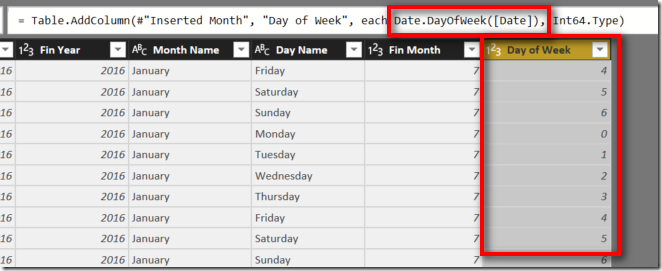
. But might be tricky with some of the more difficult transformations - I had a lot of fun generating Tax Months in PQ (6th April year start) and am not sure how I would go about doing that in DAX. All part of the learning curve!
 
Upvote 0

Forum statistics

Threads
1,214,651
Messages
6,120,744
Members
448,989
Latest member
mariah3

We've detected that you are using an adblocker.

We have a great community of people providing Excel help here, but the hosting costs are enormous. You can help keep this site running by allowing ads on MrExcel.com.
Allow Ads at MrExcel

Which adblocker are you using?

Disable AdBlock

Follow these easy steps to disable AdBlock

1)Click on the icon in the browser’s toolbar.
2)Click on the icon in the browser’s toolbar.
2)Click on the "Pause on this site" option.
Go back

Disable AdBlock Plus

Follow these easy steps to disable AdBlock Plus

1)Click on the icon in the browser’s toolbar.
2)Click on the toggle to disable it for "mrexcel.com".
Go back

Disable uBlock Origin

Follow these easy steps to disable uBlock Origin

1)Click on the icon in the browser’s toolbar.
2)Click on the "Power" button.
3)Click on the "Refresh" button.
Go back

Disable uBlock

Follow these easy steps to disable uBlock

1)Click on the icon in the browser’s toolbar.
2)Click on the "Power" button.
3)Click on the "Refresh" button.
Go back
Back
Top