Print specific rows on new page at end of document

sparky2205

Active Member
Joined
Feb 6, 2013
Messages
476
Office Version
  1. 365
  2. 2016
Platform
  1. Windows
I have a spreadsheet that can vary greatly in length. It is used to record data from various processes which could result in the final document being 1 page or 10 pages.
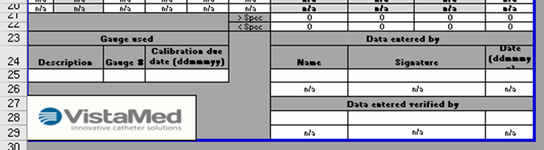
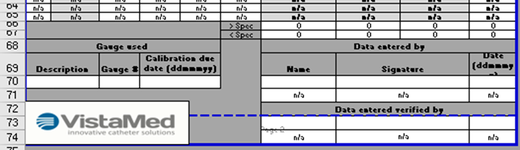
There is a signoff section at the end of the document which compromises 7 rows. If the entirety of this section doesn't fit on one page at the end of the document I want the entire section to be moved to the next page so that the section is kept together. If there is enough room on the final page of the document it should remain on that page. The section must not be printed on every page, just the final page.

I don't like coming to the table with no starting attempt but my thought processes have led me down blind alleys to this point.
I was going in the direction of getting the last used row by hiding a piece of text in a hidden cell at the end of Column A, then using this as a starting point to subtract from the top of the page. Alas, I don't know how to get the top of the page so, as I said, blind alley.

Appreciate any thoughts.
 
Hi John,
I did a bit of testing with your new code. The results are below. I hope my screenshots come across to you ok.

Starting position:
1660057554270.png


Add 45 rows: (macro not run). Signoff section split across pages 1 and 2.
1660057573420.png


While running macro:
1660055957968.png
1660055970906.png

Result: signoff section moved to page 2. This is as expected.
1660057611924.png


After adding a further 10 rows and without running the macro, the last row from page 1 is pushed onto page 2, (this is ok) and the signoff section is pushed onto page 3, (this is not what I want as there is space for the signoff section at the end of the data on page 2).
Note: I am including the 2 lines with; > spec and < spec when I refer to data

This is what the page breaks look like at this stage.
1660056119631.png


While running the macro:
1660056150465.png
1660056163990.png


After the macro has run:
1660056249200.png


What it looks like to me:
Your macro is working fine in terms of checking the position of the last horizontal page break and adjusting it if necessary.
The problem occurs when a new automatic page break is inserted as the data expands beyond the first page.
So it's not only the last page break that needs to be looked at.
Any thoughts on how that might be overcome?
 

Attachments

  • 1660055893334.png
    1660055893334.png
    64.7 KB · Views: 1
  • 1660055928530.png
    1660055928530.png
    73.7 KB · Views: 1
  • 1660056037215.png
    1660056037215.png
    90.7 KB · Views: 1
Upvote 0

Excel Facts

Excel Wisdom
Using a mouse in Excel is the work equivalent of wearing a lanyard when you first get to college
I've not been able to reproduce the problem because there are differences when I add rows.

Starting position:
1660057554270.png


Add 45 rows: (macro not run). Signoff section split across pages 1 and 2.
1660057573420.png

With the same starting position, when I add 45 rows (macro not run), the automatic page break has been inserted at row 45 and the last signoff row is row 74, so the 7 signoff rows fit below the data on page 2.

It would be easier for me to investigate if you would upload a copy of your workbook to a file sharing site and post the link to it here.
 
Upvote 0
Thanks - I've adjusted the macro for your workbook and this seems to work. It now resets all the page breaks and moves the last page break if necessary.

Note that because you have set Print Titles rows to row 8, the row 8 headings occur at the top of every page starting at page 2. Depending on the number of data rows, the headings on the last page may be followed immediately by the 7 signoff rows, with no data rows between. This occurs if you add 44 rows, for example, to the initial data.
VBA Code:
Public Sub Move_Last_Page_Break3()

    Dim originalView As XlWindowView
    Dim currentCell As Range
    Dim signoffEndCell As Range
                
    'Save current view and change it to Page Break Preview
    
    With ActiveWindow
        originalView = .View
        .View = xlPageBreakPreview
    End With

    'Look on the active sheet in the active workbook
    
    With ActiveWorkbook.ActiveSheet
        
        Set currentCell = ActiveCell
        .ResetAllPageBreaks
        
        'Find last signoff row
        
        Set signoffEndCell = .Columns("A").Find(What:="SIGNOFF", After:=.Range("A1"), LookIn:=xlFormulas, LookAt:=xlPart, _
                                                SearchOrder:=xlByRows, SearchDirection:=xlNext, MatchCase:=False, SearchFormat:=False)

        'If the last horizontal page break occurs within the 7 signoff rows move it above first signoff row
        
        If .HPageBreaks.Count > 0 Then
            
            'Select signoff cell so that Excel recalculates automatic page breaks. Can prevent "Subscript out of range" error when referencing HPageBreaks()
                
            signoffEndCell.Select
            
            If .HPageBreaks(.HPageBreaks.Count).Location.Row > signoffEndCell.Row - 6 Then
                .HPageBreaks(.HPageBreaks.Count).Delete
                .HPageBreaks.Add before:=signoffEndCell.Offset(-6)
            End If
            
            currentCell.Select
            
        End If
                
    End With
    
    'Restore original view
    
    ActiveWindow.View = originalView
    
End Sub
 
Upvote 0
Solution
Hi John,
I really don't know how to explain it now, but it isn't working for me.
Here's my scenario.
I open the spreadsheet with enough lines to fit on one page. Run the macro. All fine.
I add enough lines to push the signoff section onto page 2. Print preview without running the macro. Behaviour as expected. Splits the signoff section. Run the macro. It fixes it. Ok so far.
Then I add enough lines so that there will be data on page 2 but not enough to push the signoff section onto page 3. But the signoff section does get pushed onto page 3.
Then I close the spreadsheet without saving and reopen it.
With only 12 lines now on the spreadsheet and without running the macro the signoff section is already pushed onto page 2.
 
Upvote 0
There is no automatic adjustment of the page breaks after you add or delete rows. Therefore you should always run the macro the last thing before printing (my step in bold below).

I followed your steps with your downloaded workbook, where the last signoff row is row 29.

I open the spreadsheet with enough lines to fit on one page. Run the macro. All fine.
Run the macro. Everything is correctly printed on one page.


I add enough lines to push the signoff section onto page 2. Print preview without running the macro. Behaviour as expected. Splits the signoff section.
I add 40 rows, which splits the signoff section between pages 1 and 2.


Run the macro. It fixes it. Ok so far.
I run the macro, which correctly moves the whole signoff section to page 2. OK so far.

Then I add enough lines so that there will be data on page 2 but not enough to push the signoff section onto page 3. But the signoff section does get pushed onto page 3.
I add 20 rows. Yes, the signoff section is moved to the top of page 3. I run the macro and now there are 2 pages, with the signoff section correctly moved to page 2, with some data rows and the header row above it.

Then I close the spreadsheet without saving and reopen it.
With only 12 lines now on the spreadsheet and without running the macro the signoff section is already pushed onto page 2.
I close the workbook without saving and reopen it. With 29 rows on the worksheet, there is only 1 page and the whole signoff section is on page 1 - the same as the original downloaded workbook.
 
Upvote 0
Morning John,
I see it now, as long as the macro is always run before printing this works perfectly.
Thanks very much for all your help with this and for sticking with me to a resolution.
Another problem solved by MREXCEL.COM.
Have a good day.
 
Upvote 0

Forum statistics

Threads
1,214,642
Messages
6,120,700
Members
448,979
Latest member
DET4492

We've detected that you are using an adblocker.

We have a great community of people providing Excel help here, but the hosting costs are enormous. You can help keep this site running by allowing ads on MrExcel.com.
Allow Ads at MrExcel

Which adblocker are you using?

Disable AdBlock

Follow these easy steps to disable AdBlock

1)Click on the icon in the browser’s toolbar.
2)Click on the icon in the browser’s toolbar.
2)Click on the "Pause on this site" option.
Go back

Disable AdBlock Plus

Follow these easy steps to disable AdBlock Plus

1)Click on the icon in the browser’s toolbar.
2)Click on the toggle to disable it for "mrexcel.com".
Go back

Disable uBlock Origin

Follow these easy steps to disable uBlock Origin

1)Click on the icon in the browser’s toolbar.
2)Click on the "Power" button.
3)Click on the "Refresh" button.
Go back

Disable uBlock

Follow these easy steps to disable uBlock

1)Click on the icon in the browser’s toolbar.
2)Click on the "Power" button.
3)Click on the "Refresh" button.
Go back
Back
Top