Text which disappears when new text is entered but reappears if the new text is deleted

Detectiveclem

Active Member
Joined
May 31, 2014
Messages
320
Office Version
  1. 365
  2. 2016
Platform
  1. Windows
  2. MacOS
Help needed I would like to have greyed-out text (watermark?) in some cells to give users short instructions for that particular cell. If they type something in that cell, the text they input is in plain dark black...but if they delete what they type, the cell goes back to having the greyed-out text.

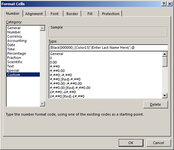
So just for an example, one cell might say ENTER LAST NAME. The next cell going down the same column may say ENTER YOUR DATE OF BIRTH. When the user starts typing into these cells the greyed-out text disappears and their inputted text shows up in DARK BLACK. BUT if they delete what they typed, the original grey-out text reappears (e.g. ENTER YOUR LAST NAME, or what ever was in the cell previously reappears greyed-out)

As this spreadsheet will be shared with others, I am looking for a solution which avoids VBA.

Does anyone have a suggestion?

Thank you.
 

Excel Facts

Excel Can Read to You
Customize Quick Access Toolbar. From All Commands, add Speak Cells or Speak Cells on Enter to QAT. Select cells. Press Speak Cells.
Maybe in Office 2025...
In the meantime you could use Data validation:
-select the starting cell and start the data validation wizard
--in the Setting tab, select Allow=Any value
--in the Input Message tab, type "Enter Last Name"
--click Ok to close data validation

Now if you select that cell, the Input Message will show up; it will disappear when you select a different cell

Add more data validations to the other cells in the row; then copy these row and Paste-special data validation on the rows below

Of course you may take advantage of the data validation fetures, for example to allow only dates in cells that need a date

Bye
 
Upvote 0
Thank you Anthony47.

This partially could be used as a work around, but ideally I would prefer even a greyed-out watermark in the relevant cells which will disappear when text is entered being replaced with text in black irrespective of if is subsequently deleted.

I am sure this must be possible, but I just don't know how to achieve it.

Any thoughts?
 
Upvote 0
You could try a Custom Format
Code:
[Black]000000;;[Color15]"(First Name)";@

It is not exactly as you requested but it will give the grey name look that you wanted and when you type in the cell the text will turn black.
To delete the text, just enter 0 (zero), that triggers the format an will leave you with an empty looking cell with the watermark.

Book2
ABC
1
2(order number)
3
4(First Name)
5
6(Last Name)
7
8
Sheet1
 
Upvote 0
Another way is to cheat.
Put the watermark text in the next cell and reduce the column width to say 0.1 wide, indent the text to the right so it looks like it is in the cell to the left. You can also play with the number of spaces after the watermark text.

Custom Format watermark.xlsx
ABCDEFG
1
2WatermarkFirst Name
3
4Watermark in cell C2First Name in cell F4
5with spaces after the wordColumn F width = 0.1
6
7
Sheet2
 
Upvote 0
Hi Taul, thank you. I am not sure how to add the code you provided, can you please lead me through the process. I am not sure about the watermark you mention and would prefer code as you suggested.
Screenshot 2020-11-23 at 07.22.29.png


Any text in column C I want to remain the same, but in column D I want the person using the spreadsheet to for example type their last name in cell D3 which will replace the Greyed instructional text with their surname in black.

Any help to achieve this would be greatly appreciated.

Thank you.
 
Upvote 0
VBA code will not run while a cell is in Edit Mode, so if your default text is gray in color, the new text the user types in the cell will be gray until the value typed into the cell is committed at which point it will turn black. Assuming you start a new sheet with the default text already in place (as your example shows), then give this event code a try (I only set it up for the two entries for cells D3 and D4... you can add the rest)...
VBA Code:
Private Sub Worksheet_Change(ByVal Target As Range)

  If Target.Count = 1 Then
    Dim Colr As Long, Txt As String
    If Target.Address(0, 0) = "D3" Then
      Txt = "Enter Last Name Here"
    ElseIf Target.Address(0, 0) = "D4" Then
      Txt = "Enter First Name Here"
    End If
    
    Application.EnableEvents = False
    If Len(Target.Value) = 0 Or Target.Value = Txt Then
      Target.Font.ColorIndex = 16
      Target.Value = Txt
    Else
      Target.Font.ColorIndex = 1
    End If
    Application.EnableEvents = True
  End If
  
End Sub

HOW TO INSTALL Event Code
------------------------------------
If you are new to event code procedures, they are easy to install. To install it, right-click the name tab at the bottom of the worksheet that is to have the functionality to be provided by the event code and select "View Code" from the popup menu that appears. This will open up the code window for that worksheet. Copy/Paste the event code into that code window. That's it... the code will now operate automatically when its particular event procedure is raised by an action you take on the worksheet itself. Note... if you are using XL2007 or above, make sure you save your file as an "Excel Macro-Enabled Workbook (*.xlsm) and answer the "do you want to enable macros" question as "yes" or "OK" (depending on the button label for your version of Excel) the next time you open your workbook.
 
Upvote 0
Hi,
I assume you mean the code from post #4

Select the cell where you want the placeholder text (cell D3)
On the ribbon, go to FORMAT
Select FORMAT CELLS
In the CATEGORY list, select CUSTOM
Just under the TYPE, paste the code given in post#4
Click OK

Also, have a go at using Rick’s code, he has listed the instructions. It provides exactly what you asked for in the original request.

Cheers
Paul
 

Attachments

  • pic1.jpg
    pic1.jpg
    135.3 KB · Views: 341
Upvote 0
Thank you Rick, this works perfectly. As the VBA sits in the background I am sure it will just be perfect. And thank you for your very clear instructions. One question will I need to add to the code every cell i want this to happen with (I have about 100!!!).
Thank you so much again.
Paul
 
Upvote 0

Forum statistics

Threads
1,214,589
Messages
6,120,415
Members
448,960
Latest member
AKSMITH

We've detected that you are using an adblocker.

We have a great community of people providing Excel help here, but the hosting costs are enormous. You can help keep this site running by allowing ads on MrExcel.com.
Allow Ads at MrExcel

Which adblocker are you using?

Disable AdBlock

Follow these easy steps to disable AdBlock

1)Click on the icon in the browser’s toolbar.
2)Click on the icon in the browser’s toolbar.
2)Click on the "Pause on this site" option.
Go back

Disable AdBlock Plus

Follow these easy steps to disable AdBlock Plus

1)Click on the icon in the browser’s toolbar.
2)Click on the toggle to disable it for "mrexcel.com".
Go back

Disable uBlock Origin

Follow these easy steps to disable uBlock Origin

1)Click on the icon in the browser’s toolbar.
2)Click on the "Power" button.
3)Click on the "Refresh" button.
Go back

Disable uBlock

Follow these easy steps to disable uBlock

1)Click on the icon in the browser’s toolbar.
2)Click on the "Power" button.
3)Click on the "Refresh" button.
Go back
Back
Top