
Excel 2024: Use Default Settings for All Future Workbooks
February 28, 2024 - by Bill Jelen

Do you have favorite worksheet settings in Excel? I do. There are things I do to every new workbook I create.
In a few minutes, you can teach Excel your favorite settings. Then, every time you create a new workbook with Ctrl+N or insert a new worksheet, the worksheet will inherit all of your favorite settings.
The key step is to save the workbook as a template into a specific folder with two specific names.
Start with a blank workbook with a single worksheet.
Apply all your favorite settings. There are dozens of possibilities. Here are a few that I use:
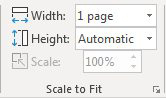
On the Page Layout tab, change the Scale to Fit so the Width is 1 page. Leave Height set to Automatic and Width set to 1 Page.
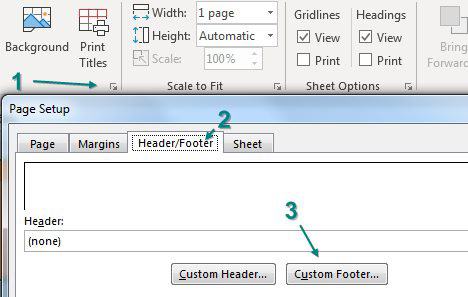
Create a custom header or footer. Use the dialog launcher in the bottom right of the Page Setup group. Go to the Header/Footer tab. Choose Custom Footer. Type whatever is your company standard in the footer.
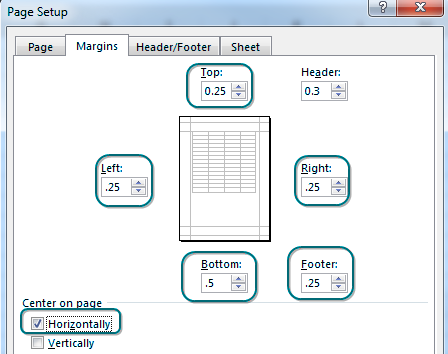
Create custom margins. I like narrow margins - even more narrow than the built-in Narrow margin settings. I've been using 0.25-inch margins since the 1990s, and they're automatically set for me because I've added that to my template.
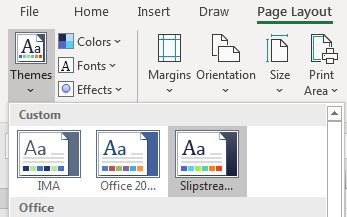
Choose a theme. I like the colors from Slipstream, but I prefer the Effects from Office 2007-2010.
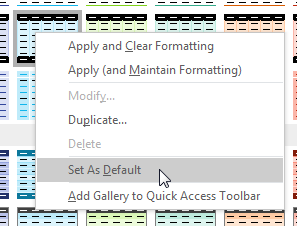
When you set a pivot table default theme, it only applies to the current workbook. Excel never saves your preference. Create a tiny two-cell data set. Create a pivot table. Change the default formatting. Delete the pivot table and the data set. The template will remember the setting.
|
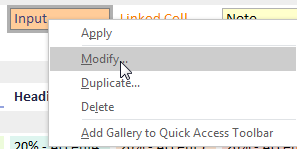
Would you use cell styles more often if they weren't so ugly? Do you hate that input cells are orange? Go to Cell Styles, right-click Input, and choose Modify as shown below. Click the Format button and choose a different input color. |
 |
If you develop some favorite functions stored as LAMBDA functions in the Name Manager, you can store those functions in your Book.XLTX workbook.
I've just shown you some of my favorite settings. I'm sure you have your own favorites. Maybe you always set up a name to define the tax rate. Add it to your template, and you will never have to set it up again. Turn off gridlines. Do whatever you always do.
Once you've finished customizing your workbook, you need to figure out which file type you use most often. For people who never use macros, this is often XLSX. But I always use macros, so my default file type is XLSM. Maybe you want workbooks to open faster, and you use XLSB. There is a template format related to each of these file types, and you can just change the extension as needed. So, for me, I save the workbook as XLTM. You might save it as XLTX or XLTB.
As soon as you choose one of these file types, the Save As dialog box moves to a templates folder. You need to save the workbook in a different folder.
![The default path for templates is C:\Users\[your name]\App Data\Roaming\Microsoft\Excel\XLStart](/img/content/2024/02/XLFig214.png)
In the folder bar, type %AppData% and press Enter to get to the AppData\Roaming\ folder on your computer. From there, navigate to Microsoft\Excel\XLSTART.
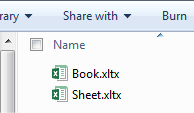
Save the workbook with the reserved name Book plus the appropriate extension. Use Save As again and save the workbook in the same folder but use Sheet plus the same extension as the name.
Of course, you only have to set this up once. After you do it, any time you use Ctrl+N to create a new workbook, the new workbook will inherit all of the settings from your template named Book.
Why did you have to also save templates named both Book and Sheet? Any time you insert a new worksheet into an existing workbook, Excel uses the Sheet template.
My Rant About New and New
I've been using Book.xltm for 30 years. In all versions of Excel from Excel 95 up through Excel 2003, the Excel Standard toolbar had an icon called New Click that icon, and Excel loaded the Book template. Everything was great.
The File menu offered a New option, but hardly anyone used it because it was half as many clicks to simply click the New icon on the Standard toolbar. New respects your custom settings in the Book template. New does not.
If you've set up custom Book and Sheet templates, do not click the Blank Workbook template. Simply dismiss this opening screen by using the Esc key, and your custom Book template loads.
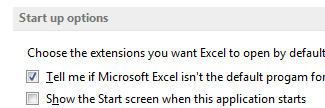
If you get tired of pressing Esc, go to File, Options, General and deselect the checkbox Show the Start Screen When This Application Starts.
Bonus Tip: Changes to Book Template are Cumulative
I've had the opportunity to speak at three consecutive Excelapalooza conferences near Dallas. The conference team arranges two simultaneous tracks about Microsoft Excel. While I am presenting in one ballroom, Lawrence Mac McClelland is presenting another track in another ballroom. I picked up this tip from Mac:
Anything you do to Book.xltx is cumulative. Build the workbook with your favorite settings today. If you discover some new settings that you would like to add to Book.xltx in the future, follow these steps:
1. Press Ctrl+N to open a blank version of Book.xltx.
2. Make any changes you would like.
3. Select File, Save As.
4. Change the file type to XLTX or XLTM, depending on whether you regularly use macros.
5. Change Folder to the XLStart folder.
6. Save the file as Book.xltx to replace the existing Book.xltx.
7. Repeat steps 3-5 and save the file as Sheet.xltx.
Bonus Tip: Replace the Comma Style in Book.xltx
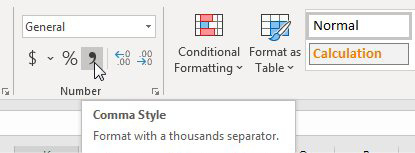
The Excel team offers Currency, Percent, and Comma icons in the center of the Home tab of the Ribbon. The tooltip says the Comma Style formats with a thousands separator. I despise this icon.
|
Why do I despise this icon? Because it turns on Accounting style. Sure, that gives you a thousands separator, but it also adds several things that I hate:
|
 |
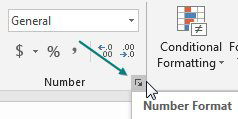
There is no way to replace the Comma icon with my own icon or even to change what style it applies. So, I find that I have to click the Dialog Launcher icon at the bottom right of the Number group:
Tip
The Dialog Launcher icon is a diagonal arrow pointing down and to the right. It is found in many groups in the Ribbon and usually offers far more choices than are available in the Ribbon.
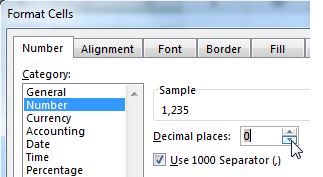
Then choose Number from the Category list, choose the checkbox for Use 1000 Separator, and click twice on the down arrow to change 2 decimal places to 0 decimal places. Click OK to close the Format Cells dialog. It takes six clicks to create a simple number format with a comma as the thousands separator. That is why I despise the Comma icon: People who can live with right indents, parentheses, and zeros displayed as dashes can apply that style in one click, but people who just want a comma have to go through six clicks.
The great news: There is a solution. The bad news: Microsoft makes it hard to use the solution. The good news: If you add the solution to the Book.xltx file, the solution will become mostly permanent for all files that you create. Here is what you do:
1. While you are creating Book.xltx, type 1234 in a cell. Format the cell using the six clicks discussed above (or your favorite format). Keep that cell selected.
2. Open the Cell Styles gallery. Near the bottom, choose New Cell Style.

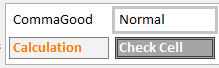
3. In the Style box that appears, type a descriptive name for your style, such as CommaGood.
4. If you only want to apply the Number format, unselect the checkboxes for Alignment, Font, Border, Fill, and Protection.
5. Click OK to create the new style.
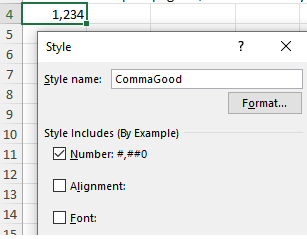
New styles appear at the top of the Cell Styles gallery, and you now have one-click access to the CommaGood style.
Caution
Any cell style added using this method applies only to the current workbook, making this tip almost useless.
Tip
If you add the CommaGood style to your Book.xltx file, the CommaGood style will be available on all future workbooks that you create with Ctrl+N.
Thanks to Jo Ann Babin for an idea similar to this one.
Bonus Tip: The Consolas Font Makes it Easy to Tell Zero from the Letter O
Way back in 2009, font designer Erik Spiekermann designed the Axel font specifically for use with Excel. You can still buy the font today, often for US $30 per computer. However, if your whole goal is to get a slashed zero, then the Consolas font is built in to Windows computers and is free to use.
Every half decade, Microsoft changes the default font in Excel. Today, we have Aptos that has taken over for Calibri which took over for Arial. How about adopting Consolas as the default font in your spreadsheets? You can either change the font in book.xltx or use File, Options, General, and Use This As The Default Font.

This article is an excerpt from MrExcel 2024 Igniting Excel
Title photo by Jerry Zhang on Unsplash