I recently made something very similar for another thread on this board, so I have adjusted that for you: (original thread
http://www.mrexcel.com/forum/excel-...book-hundreds-sheets-list-specific-sheet.html)
you will need to do some work here. It is not difficult if you follow the instructions exactly. What we are going to do is create a userform where you can select the sheet names and enter a basename for the pdf file names. The form will handle what to do when you press the OK button.
- Open your workbook (with all the sheets). Close any other workbooks to keep things easy.
- Now press Alt-F11 to open the <acronym title="visual basic for applications" style="border-width: 0px 0px 1px; border-bottom-style: dotted; border-bottom-color: rgb(0, 0, 0); cursor: help;">VBA</acronym> editor. You will see in the top left panel your workbook with all the sheets listed.
- Somewhere there right click your mouse and select 'Insert...' / 'User Form'
- In the right panel an empty userform appears.
- Hopefully in the bottom left panel a list of properties for the form is shown. If not press F4.
- The very first item of the properties is '(Name)' which reads UserForm1
- This is pretty meaningless, so rename it to 'SheetsForPrinting'
- Go down the list in the properties to 'Caption'. It says 'UserForm1'.
- Change the caption to "Sheets for Printing"
- Look at your form, you can see the new title it has.
- Click once on the form. Hopefully a little toolbox window will appear. if not goto 'View' in the menu and select 'Toolbox'
- You want to know what the form does, so let's put some text on it. click on the 'A' in the toolbox to paint a label.
- Take your mouse to the userform and from top left to about a cm down and to the right of the form 'paint' a label box
- put the cursor in this box and type (or copy /paste from here):"Select the sheets you want to have printed form the list. Use Ctrl key to select multiple individual sheets"
- OK, now we need to be able to do something useful with the form. Go to the Toolbox and hover your mouse over the icons till you find 'ListBox' (normally 1st icon on second row). Click on it
- Now back to the userform and paint a square below your label to just above the bottom of the form. This is where the sheet names will appear (when called)
- We also want to be able to enter a base name for the pdf output (they will all get a sequential number and date appended)
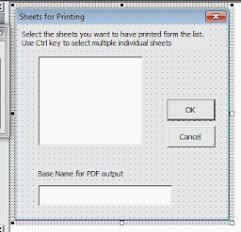
- So from the toolbox select the ab| icon and paint a textbox a bit below the list box (see image below to get an idea. You can make the form bigger by dragging the bottom edge)
- We also want a label above it to explain what the textbox is for: make a label and give it the caption: 'Base Name for PDF output'
- Lastly we need some buttons: on the Toolbox find the little button icon (CommandButton). Click it
- Back to the form and to the right of our square paint a button
- click once on the button. Then hold down the Ctrl key and drag a copy of the button to below the first button (handy way to keep buttons same size)
- In the Properties window (bottom right) change the caption of the button to 'Cancel'
- Click once on the first button
- In the Properties window change the caption of the button to 'OK'
- Go a bit further down the properties list to 'Default'. set that to True (this means it will react to the Enter key)
Hey you now have a wonderful form! Should look something like this:
- Click on your userform title and press F5. Hey there it is. But the list is empty and the buttons don't do anything.
- Press the red close button to close the form. Let's go add some functionality...
- Now let's start with the cancel button. Double click on the cancel button. The form disappears and an empty white space is looking at you with a skeleton macro in it for the cancel button.
- Delete everything and paste the following text:
Option Explicit
Private Sub CommandButton2_Click()
' Cancel Button
Unload Me
End Sub
- Basically it says: if you click the cancel button then unload (close) the userform (Me)
- You can try it. Press F5. the cancel button should now work
- Now paste the following code below the code of the cancel button
Private Sub CommandButton1_Click()
' OK button
Dim i As Long, j As Long
Dim vShList As Variant
Dim sFName As String
With ListBox1
' use an array to store the selected sheets
ReDim vShList(1 To .ListCount, 1 To 1)
j = 1
For i = 0 To .ListCount - 1
If .Selected(i) Then
vShList(j, 1) = .List(i)
j = j + 1
End If
Next i
If j = 1 Or TextBox1.Value = vbNullString Then
'no sheet was selected or no name was given
MsgBox "At least one sheets needs to be selected and an output name to be entered", vbCritical
Else
' we have sheets selected and a valid base name
j = 1 ' filename counter
sFName = ThisWorkbook.Path & "" & TextBox1.Value
For i = 1 To UBound(vShList, 1)
If Not IsEmpty(vShList(i, 1)) Then
'print the sheet
PrintAsPDF CStr(vShList(i, 1)), sFName & " - " & Format(j, "000") & " - " & Format(Date, "yy-mm-dd")
j = j + 1
End If
Next i
End If
Unload Me
End With
End Sub
Private Sub UserForm_Initialize()
Dim wsWS As Worksheet
' fill the list box with all sheet names, but not Main_List
For Each wsWS In ThisWorkbook.Worksheets
If wsWS.Name <> "Main_List" Then
ListBox1.AddItem (wsWS.Name)
End If
Next wsWS
' put a default name for the base PDF name
TextBox1.Value = Left(ThisWorkbook.Name, InStr(1, ThisWorkbook.Name, ".") - 1)
End Sub
OK now we have added the code for the OK button and for loading (starting) the userform.
Press F5 again. Wow! you can see all the sheets in the listbox. Select a few. Now press the OK button. Gosh you get an error message. That is because it expects a print sup which we haven't created yet. End the macro.
OK so we need two more things. We need to call up the user form. So we write a little macro and attach that to a button which we stick in Main_List. We also need a little pdf print macro. This is called by the userform.
- Go back to the <acronym title="visual basic for applications" style="border-width: 0px 0px 1px; border-bottom-style: dotted; border-bottom-color: rgb(0, 0, 0); cursor: help;">VBA</acronym> editor. Now right click again on the workbook in the top left panel and select 'Insert..' / 'Module'
- A new section Modules will appear below the workbook and the right panel has cleared with the new module open.
- Here we can write macros that we can access from the workbook.
- Paste the following macro:
Option Explicit
Sub SelectSheets()
' call userform to select sheets for printing
SheetsforPrinting.Show
End Sub
Sub PrintAsPDF(ByVal sWS2Print As String, ByVal sSaveName As String)
' Print Macro
'
'PDF export, do not open directly in Acrobat _
in case there are many hundreds printed
Sheets(sWS2Print).ExportAsFixedFormat _
Type:=xlTypePDF, _
Filename:=sSaveName, _
OpenAfterPublish:=False
End Sub
- Now if you want to run this using a shortcut key, go to Excel. Press Alt-F8. It will show a dialog box with your macro 'SelectSheets' shown.
- Select the macro (don't double click)
- Press the Option... button and select a suitable shortcut sheet for it (preferably something with Shift, as a lot of the other keys already do something)
- Click OK and then go back to the sheet. In cell D1 or so type your shortcut in (Ctrl-Shift-S for instance) so you don't forget
Then try it.
Finished
- If you rather have a button, then you probably first need to enable the 'Developers' menu.
- Right click on the menu ribbon, select 'Customise the Ribbon...'
- In the right panel check the tickbox infront of 'Developer'.Click OK
- Go to the Developer menu
- Press the 'Insert' icon
- select the button from the 'Form Controls' (top left icon)
- in your spreadsheet paint your button
- A dialog box opens to ask which macro it should run. Select your macro, click OK
- The button appears, Click on the button to edit the text to somethin meaning full (right clicking allows you to change size, position, text)
Press the button
Let me know if this worked and how happy you now are!
I haven't added any checking to see if the filenames already exist, so if you run it several times on a day, you need to delete or move the pdfs first. Also I have made it so that the pdfs are stored in the same folder as the workbook running the macro.