
Printing in Excel
June 26, 2006
Today's episode reveals some printing secrets in Excel.
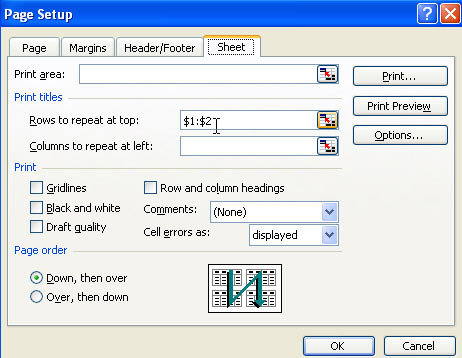
Print titles at the top of each page
To print your headings from row 1 at the top of each page, follow these steps:
- From the Excel menu, choose File - Page Setup.
- Select the 4th tab in the dialog box - the Sheet tab.
- In the box for Rows to Repeat at Top, enter 1:1. For two rows, use 1:2. Excel will add the dollar signs after you close the dialog.
Print a letter at the top of page 1, and then repeat headings at the top of each additional page.
Say that you want to print a letter at the top of page 1, followed by a long report. Perhaps your letter is in rows 1-20 and the headings are in row 21 - 23. Data follows in rows 24-9000.
It is amazing that this works, but if you follow the steps above, specifying that rows 21:23 should be the rows to repeat at top, it will actually work. Excel will not print rows 21:23 at the top of page 1. Those rows will appear at the top of pages 2:150.
Print page numbers at the bottom of each page
While rows to repeat at top puts the headers on each page, there is something else called called Header/Footer. These tags will print outside the data area on each page. To add a page number to the bottom of each printed page, follow these steps:
- From the Excel menu, choose File - Page Setup.
- Select the 3rd tab in the dialog box - the Header/Footer tab.
- In the Footer dropdown, choose Page 1 of ?

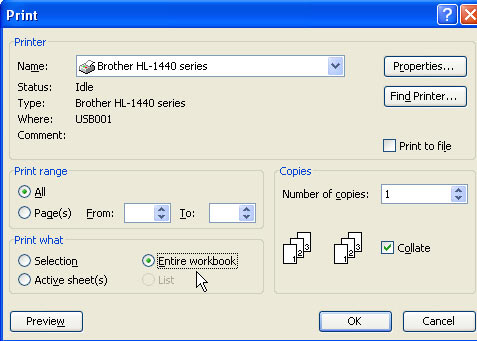
Print the Entire Workbook at once
If you have page numbers assigned to each worksheet, and then attempt to print using the print icon, Excel will start over at page 1 as you print each worksheet.
To have all of the pages numbered sequentially starting at 1 and continuing for the entire workbook, follow these steps.
- Select File - Print
- In the Print What section, choose Entire Workbook
- Click OK