JohanGduToit
Board Regular
- Joined
- Nov 12, 2021
- Messages
- 89
- Office Version
- 365
- 2016
- Platform
- Windows
Greetings Everybody,
I am new to this forum and apologise if I am submitting this request incorrectly or within the wrong forum.
I would truly appreciate assistance with adding (product item) pictures into a column located next to a selected column range which contains product codes.
The column containing 'Product Item Codes' is not in a fixed location (not a fixed range) and can be anywhere on an active worksheet. Product Image files are saved in a folder on our server
and each image filename correspond with values contained in the Product Item Column. I have managed to do this successfully utilizing Pictures.Insert; but this method, as you very well
know, does not embed images within the spreadsheet. Embedding images within the sheet is very important to us, so I have to revisit and adjust my code.
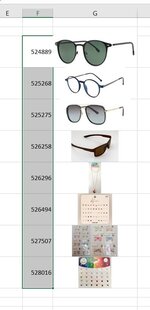
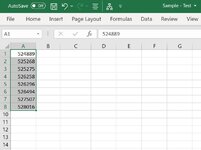
I have uploaded 2 images files : "Pre_Add_Picture" and "Post_Add_Picture" - "Pre-Add_Picture" samples a listing of "Product Item Codes" (before running the Macro/VBA code) and the "Post_Add_Picture" shows the expected results (after the Macro/VBA code was ran). Mini Sheet contain the working code for Pictures.Insert - but this needs to be modified to do an "Add.Picture" instead. Columns Height and Width's are also set to accommodate the images and images are sized to fit accordingly.
Below the working code for Pictures.Insert (I could not figure out how to do the mini sheet upload, sorry!):
'=====
'=====
Your assistance will be GREATLY APPRECIATED and will make the lives of our staff so much easier!!
Thanking you in advance!
I am new to this forum and apologise if I am submitting this request incorrectly or within the wrong forum.
I would truly appreciate assistance with adding (product item) pictures into a column located next to a selected column range which contains product codes.
The column containing 'Product Item Codes' is not in a fixed location (not a fixed range) and can be anywhere on an active worksheet. Product Image files are saved in a folder on our server
and each image filename correspond with values contained in the Product Item Column. I have managed to do this successfully utilizing Pictures.Insert; but this method, as you very well
know, does not embed images within the spreadsheet. Embedding images within the sheet is very important to us, so I have to revisit and adjust my code.
I have uploaded 2 images files : "Pre_Add_Picture" and "Post_Add_Picture" - "Pre-Add_Picture" samples a listing of "Product Item Codes" (before running the Macro/VBA code) and the "Post_Add_Picture" shows the expected results (after the Macro/VBA code was ran). Mini Sheet contain the working code for Pictures.Insert - but this needs to be modified to do an "Add.Picture" instead. Columns Height and Width's are also set to accommodate the images and images are sized to fit accordingly.
Below the working code for Pictures.Insert (I could not figure out how to do the mini sheet upload, sorry!):
'=====
VBA Code:
Sub InsertImages()

Dim I As Integer
Dim PPath As String
Dim Col, X, Y As Long

X = Selection.Rows(1).Row
Y = Selection.Rows.Count + X - 1
Col = Selection.Columns(1).Column

Selection.RowHeight = 50
Columns(Col + 1).ColumnWidth = 8

With Selection
    .VerticalAlignment = xlCenter
End With

For I = X To Y
    'Product Code (Picture Filename) in Column A - but this can be any column range and will vary in how many items are selected)
    'PPath = "\\QVSERV\ANALYSER\DATA\IMAGES\" & CStr(Cells(I, Col).Value) & ".JPG"
    PPath = "\\RDSSERV\FUTURA\SVEN\BILD\" & CStr(Cells(I, Col).Value) & ".JPG"

    On Error Resume Next

    With ActiveSheet.Pictures.Insert(PPath)
        With .Placement
            .xlMoveAndSize
        End With
        With .ShapeRange
            .LockAspectRatio = msoFalse
            .Width = 50
            .Height = 49
        End With
        .Left = ActiveSheet.Cells(I, Col + 1).Left
        .Top = ActiveSheet.Cells(I, Col + 1).Top
        .Placement = 1
        .PrintObject = True
    End With
Next

End SubYour assistance will be GREATLY APPRECIATED and will make the lives of our staff so much easier!!
Thanking you in advance!

") Have a gr8 weekend. Please inbox me your address details (if you wish) and wine preference...
Have a gr8 weekend. Please inbox me your address details (if you wish) and wine preference...