VBA code to save active sheet in new file

Jason1H

New Member
Joined
Sep 17, 2021
Messages
20
Office Version
  1. 2016
  2. 2013
Platform
  1. Windows
Good Day,

I was scrolling through the threads to see if there is any previous posts about saving the active worksheet to a new workbook, where the new file workbook name will be based on data from a given cell as well as allow the user to pick the file location to save. I am not having much luck doing so.
I am in the process of taking all of our current quality control documents (60 sheets to be precise) and combining them into one "master template" workbook, with working links from the contents page to each of the worksheets. On each of the worksheets, I would like it if when the team members are done filling out the sheets they could do a "save as" macro of the active sheet and be able to save it to a location of their choice within their project folder.
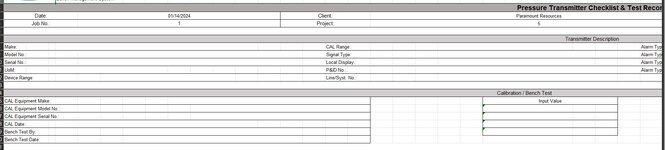
I will need to alter the reference cell that is used for the file name as we have about 6 different formats. I can figure that out and will save each of them as a different module, and assign these individual buttons. The initial reference cell is $AM5:$BA5.
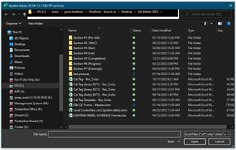
Just need help in setting up the initial code. Any help is much appreciated and thank you in advance. Below is a screenshot of the macro buttons I am using. I have been able to sort out the home and print active worksheet buttons

1705209071353.png
 

Excel Facts

Using Function Arguments with nested formulas
If writing INDEX in Func. Arguments, type MATCH(. Use the mouse to click inside MATCH in the formula bar. Dialog switches to MATCH.
There are a number of different ways you could effect a Save As of a particular worksheet. Probably the simplest would be to just have the VBA code copy the entire sheet to a new workbook, and have it save that... but this would bring those buttons on the sheet along with it, and I'm guessing you might not want that? (Well, "Print" and "Save to PDF" might work... but once the sheet is saved to a separate file, there will be no more "Home" to go to!)

Another simple option (that won't copy the buttons) would be just to copy the whole Print Area to a blank new one-sheet workbook, and then save that. From that dark blue line to the left of the buttons... I'm guessing you have the Print Area already configured for your sheets? If so, then that's something you can take advantage of. :) Here's a macro that will do that:

VBA Code:
Sub SaveActiveSheetAs(FileNameLocation As String)
    Dim oSheet As Worksheet
    Dim sDefault As String
    Dim vFilename As Variant
    Const sFilters As String = "All Files (*.*), *.*, Excel Workbook (*.xlsx), *.xlsx"
    Dim oCopy As Workbook
    Dim oData As Range
    On Error GoTo Fail
    
    Set oSheet = ActiveSheet
    sDefault = oSheet.Range(FileNameLocation).Cells(1).Value
    vFilename = Application.GetSaveAsFilename(sDefault, sFilters, 2, "Save Worksheet As")
    If vFilename = False Then GoTo Fail  ' Don't save if user clicked Cancel
    
    Application.ScreenUpdating = False
    Set oCopy = Workbooks.Add(xlWBATWorksheet)
    
    On Error Resume Next
        Set oData = oSheet.Range("Print_Area")
        If Err Then
            Set oData = oSheet.UsedRange
            Err.Clear
        End If
    On Error GoTo Fail
    
    oData.Copy
    With oCopy.Worksheets(1)
        .PasteSpecial xlPasteColumnWidths
        .Paste
        .Cells(1).Select
    End With
    oCopy.SaveAs vFilename
    oCopy.Close
    Application.ScreenUpdating = True
    
    MsgBox "Saved this worksheet as: " & vFilename, vbInformation, "Saved a Copy"
Exit Sub
Fail:
    Application.CutCopyMode = False
    MsgBox "Worksheet was not saved", vbExclamation, "Copy Not Saved"
End Sub

This macro will (1) show the user the Save As dialog, using whatever is in $AM5:$BA5 as the suggested default name, but allowing him/her to change it if desired, (2) create a new blank one-sheet workbook, (3) copy the Print Area of the sheet into the new workbook, falling back to the used area of sheet if no print area has been configured, and (4) save the new one-sheet workbook using the name from step 1, and close it.

Please note: this macro takes an argument, so when you right-click on the Save button and go to "Assign Macro", you will not see SaveActiveSheetAs in the list of assignable macros like you usually would! You need to type it in as 'SaveActiveSheetAs "$AM$5:$BA$5"', with double-quotes around where you want to draw the default Save-As name, and with single-quotes around the whole thing, like so:

1705216127483.png


This will cause clicking on the Save button to call the SaveActiveSheetAs macro, with the FileNameLocation argument set to the string "$AM$5:$BA$5".

If you don't want to do that, or if you want to make sure SaveActiveSheetAs shows up in the macros list: then another alternative would be to store the correct location of the Save As filename on each of the different sheets as a named range, i.e. with Formulas > Define Name, making sure that it is scoped to the sheet each time & not to the entire Workbook. Then you just modify the VBA code so that the subroutine is declared as Sub SaveActiveSheetAs(), and change one other line to sDefault = oSheet.Names("FileNameLocation").RefersToRange.Cells(1).Value to get the value from the named range for that sheet. Last, you would assign the macro to the Save button as you usually would.

You can also just declare the subroutine as Sub SaveActiveSheetAs(), and change the line to sDefault = "", to skip having anything in the Save As dialog by default, for a simpler but less feature-rich approach.

If you want the saved file to remain open after the copy is saved, you can also just delete the oCopy.Close line.

Hope this works for you!
 
Upvote 0
Thank you for the quick response there Ides315. I will psate this into the module today and play around with it. For the route of going the named range via Formulas > Define Name, is there a particular name that I should enter for this or just come up with a standard name for that range regardless where that cell is located on the sheets, and the code will look for that named range?

Coding is not my specialty but I sure can build formulas, lol. thanks again for the help. I may reach out to you for other code ideas as this work book evolves.
 
Upvote 0
@ides315,

I pasted your code into the module and did as you suggested by entering the module name with the cell reference to assign the macro to the SAVE icon. However, it did not function as noted, I got the normal save prompt with the file name from the cell reference. But you will see in the attached images and their time stamp, the succession of errors that arose. You will also notice that the cell format and size became really skewed in the fill that popped up once I clicked on the not save prompt.
 

Attachments

  • Screenshot 2024-01-14 113550.jpg
    Screenshot 2024-01-14 113550.jpg
    113.5 KB · Views: 4
  • Screenshot 2024-01-14 113620.jpg
    Screenshot 2024-01-14 113620.jpg
    148.7 KB · Views: 3
  • Screenshot 2024-01-14 113639.jpg
    Screenshot 2024-01-14 113639.jpg
    9.9 KB · Views: 4
  • Screenshot 2024-01-14 113700.jpg
    Screenshot 2024-01-14 113700.jpg
    141.3 KB · Views: 4
Upvote 0

Forum statistics

Threads
1,215,073
Messages
6,122,975
Members
449,095
Latest member
Mr Hughes

We've detected that you are using an adblocker.

We have a great community of people providing Excel help here, but the hosting costs are enormous. You can help keep this site running by allowing ads on MrExcel.com.
Allow Ads at MrExcel

Which adblocker are you using?

Disable AdBlock

Follow these easy steps to disable AdBlock

1)Click on the icon in the browser’s toolbar.
2)Click on the icon in the browser’s toolbar.
2)Click on the "Pause on this site" option.
Go back

Disable AdBlock Plus

Follow these easy steps to disable AdBlock Plus

1)Click on the icon in the browser’s toolbar.
2)Click on the toggle to disable it for "mrexcel.com".
Go back

Disable uBlock Origin

Follow these easy steps to disable uBlock Origin

1)Click on the icon in the browser’s toolbar.
2)Click on the "Power" button.
3)Click on the "Refresh" button.
Go back

Disable uBlock

Follow these easy steps to disable uBlock

1)Click on the icon in the browser’s toolbar.
2)Click on the "Power" button.
3)Click on the "Refresh" button.
Go back
Back
Top