Hello all, I am seeking explanation for ribbon modification. I particularly do not understand step 4 and five and so prevent me from understanding the other steps. Thank for any help given.
Follow these steps to create a workbook that contains RibbonX code that modifies the Ribbon:
Figure 22-5: RibbonX code created a new group with two buttons.
<tbody>
</tbody>It's important to understand that the Ribbon modification is document-specific. In other words, the new Ribbon group is displayed only when the workbook that contains the RibbonX code is the active workbook. This is a major departure from how UI modifications worked in previous versions of Excel.
<tbody>
</tbody>If you've concluded that modifying Excel's Ribbon is not worth the effort, don't despair. Tools will be available that make the process much less tedious than I've described. As I write this book, only one such tool is available: Office 2007 Custom UI Editor, written by Trang Luu (see Figure 22-6). This program still requires that you create the RibbonX code manually, but it will validate the code for you. It also eliminates all the tedious [COLOR=#006600 !important]manual file manipulations. And finally, it can generate the VBA callback procedure declarations, which you can copy and paste to your VBA module.[/COLOR]
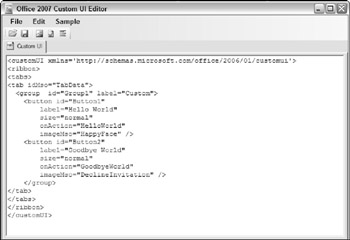
Figure 22-6: The Office 2007 Custom UI Editor.
More about the simple RibbonX example
This section provides some additional details about the <tt> ribbon modification.xlsm </tt>workbook I discuss in the previous section.
VBA CALLBACK PROCEDURES
Recall that the workbook contains two VBA procedures, <tt>HelloWorld </tt>and<tt>GoodbyeWorld </tt>. These procedure names correspond to the <tt>onAction </tt>parameters in the RibbonX code. The <tt>onAction </tt>parameter is one way to link the RibbonX code to your VBA code.
Both the VBA procedures contain an argument named <tt>control </tt>, which is an<tt>IRibbonControl </tt>object. This object has three properties, which you can access in your VBA code:
THE .RELS FILE
Inserting the file that contains the RibbonX code has no effect unless you specify a relationship between the document file and the customization file. These relationships, written in XML, are stored in the <tt>.rels </tt>file, which is in the _rels folder. Here's the relationship for the example presented in the previous section:
<relationship type="http://schemas.microsoft.com/office/2006/ relationships/ui/extensibility" target="/customUI/customUI.xml" id="12345"> The <tt>Target </tt>parameter points to the <tt>customUI.xml </tt>file that contains the RibbonX code. The <tt>Id </tt>parameter contains an arbitrary text string. The string can contain anything, as long as it's unique to the file (that is, as long as no other<tt><relationship> </relationship></tt>tag uses the same <tt>Id </tt>).
THE RIBBONX CODE
And now, the tricky part. Writing the XML code that defines your UI modification is no easy task. As I've noted, this is not [COLOR=#006600 !important]the book that will teach you how to write RibbonX code. You'll find a few simple examples here, but you'll need to [COLOR=#006600 !important]consult[/COLOR] other sources for the fine points.[/COLOR]</relationship>
Follow these steps to create a workbook that contains RibbonX code that modifies the Ribbon:
- Create a new Excel workbook, insert a VBA module, and enter two callback procedures. These are the procedures that are executed when the buttons are clicked:
Sub HelloWorld(control As IRibbonControl) MsgBox "Hello World!" End Sub Sub GoodbyeWorld(control As IRibbonControl) ThisWorkbook.Close End Sub - Save the workbook and name it <tt> ribbon modification.xlsm </tt>.
- Close the workbook.
- Activate the folder that contains the <tt> ribbon modification.xlsm </tt>file and create a folder named customUI.
- Inside that folder, use a text editor (such as Windows [COLOR=#006600 !important]Notepad[/COLOR]) to create a text file named <tt>customUI.xml </tt>with the following RibbonX XML code:
<customui xmlns="http://schemas.[COLOR=#006600 !important]<u>microsoft</u>[/COLOR].com/office/2006/01/customui"> <ribbon> <tabs> <tab idmso="TabData"> <group id="Group1" label="Custom"> <button id="Button1" label="Hello World" size="normal" onaction="HelloWorld" imagemso="HappyFace"> </button><button id="Button2" label="Goodbye World" size="normal" onaction="GoodbyeWorld" imagemso="DeclineInvitation"> </button></group></tab></tabs></ribbon></customui> - Using Windows [COLOR=#006600 !important]Explorer[/COLOR], add a <tt>.zip </tt>extension to the <tt> ribbon modification.xlsm </tt>file in Windows Explorer. The filename should now be<tt>ribbon modification.xlsm.zip </tt>.
- Drag the customUI folder you created in Step 4 into the <tt>ribbon modification.xlsm.zip </tt>file. Windows treats ZIP files as if they were folders, so drag-and-drop operations are allowed.
- Double-click the <tt>ribbon modification.xlsm.zip </tt>file to open it. Figure 22-4 shows the contents of the [COLOR=#006600 !important]ZIP file[/COLOR]. As you see, the file contains several folders.

Figure 22-4: An Excel workbook, displayed as a ZIP file. - Double-click the _rels folder within the ZIP file. This folder contains one file, named <tt>.rels </tt>.
- Drag the <tt>.rels </tt>file to a location outside the ZIP file (to your [COLOR=#006600 !important]Desktop[/COLOR], for example).
- Open the <tt>.rels </tt>file (which is an XML file) with a text editor, such as Notepad.
- Add the following line to the <tt>.rels </tt>file, before the <tt> </tt>tag:
<relationship type="http://schemas.microsoft.com/office/2006/relationships/ui/ extensibility" target="/customUI/customUI.xml" id="12345"> </relationship> - Save the <tt>.rels </tt>file and drag it back into the ZIP file, overwriting the original version.
- Remove the <tt>.zip </tt>extension so that the file is back to its original name: <tt>ribbon modification.xlsm </tt>.

Figure 22-5: RibbonX code created a new group with two buttons.
| CD-ROM | This workbook, named <tt> ribbon modification.xlsm </tt>, is available on the companion CD-ROM. |
<tbody>
</tbody>
| Tip | To display Ribbon customizations when any workbook is active, convert the workbook to an add-in file, or add the RibbonX code to your Personal Macro Workbook. |
<tbody>
</tbody>
Figure 22-6: The Office 2007 Custom UI Editor.
More about the simple RibbonX example
This section provides some additional details about the <tt> ribbon modification.xlsm </tt>workbook I discuss in the previous section.
VBA CALLBACK PROCEDURES
Recall that the workbook contains two VBA procedures, <tt>HelloWorld </tt>and<tt>GoodbyeWorld </tt>. These procedure names correspond to the <tt>onAction </tt>parameters in the RibbonX code. The <tt>onAction </tt>parameter is one way to link the RibbonX code to your VBA code.
Both the VBA procedures contain an argument named <tt>control </tt>, which is an<tt>IRibbonControl </tt>object. This object has three properties, which you can access in your VBA code:
- <tt>Context </tt>: A handle to the active window containing the Ribbon that triggered the call-back. For example, use the following expression to get the name of the workbook that contains the RibbonX code:
control.Context.Caption - <tt>Id </tt>: Contains the name of the control, specified as its <tt>Id </tt>parameter.
- <tt>Tag </tt>: Contains any arbitrary text that's associated with the control.
THE .RELS FILE
Inserting the file that contains the RibbonX code has no effect unless you specify a relationship between the document file and the customization file. These relationships, written in XML, are stored in the <tt>.rels </tt>file, which is in the _rels folder. Here's the relationship for the example presented in the previous section:
<relationship type="http://schemas.microsoft.com/office/2006/ relationships/ui/extensibility" target="/customUI/customUI.xml" id="12345"> The <tt>Target </tt>parameter points to the <tt>customUI.xml </tt>file that contains the RibbonX code. The <tt>Id </tt>parameter contains an arbitrary text string. The string can contain anything, as long as it's unique to the file (that is, as long as no other<tt><relationship> </relationship></tt>tag uses the same <tt>Id </tt>).
THE RIBBONX CODE
And now, the tricky part. Writing the XML code that defines your UI modification is no easy task. As I've noted, this is not [COLOR=#006600 !important]the book that will teach you how to write RibbonX code. You'll find a few simple examples here, but you'll need to [COLOR=#006600 !important]consult[/COLOR] other sources for the fine points.[/COLOR]</relationship>


