
Due Dates With Conditional Formatting
January 01, 2002 - by Bill Jelen
Someone from the US Army Reserves asked:
I have a simple spreadsheet with due dates. Is there a way to make the due dates turn green when they are 10 days out, and then red when they are 5 days out?
This is an easy task using Conditional Formatting. This feature was introduced in Excel 95. It allows you to specify up to three conditions and to automatically change the cell formatting based on those conditions. You can change the font, make the font bold, change the color, the background color. If you have cells which you wish to monitor to see if they leave a certain tolerance, conditional formatting is a great tool to use.
The best method is to set up the conditional format for the first cell in your column of dates, and then to copy that format down to all the other cells in the range.
Let's say your range of dates is in E2:200. You would select cell E2 and follow these steps: (scroll down a bit to see the image as you read...)
- From the menu, choose Format - Conditional Formatting...
- On the left of the Conditional Formatting dialog box, there is a dropdown that says "Cell Value Is". Click that DropDown and change the value to "Formula Is". This will change the right side of the dialog box to one long field.
- In that field, enter this formula:
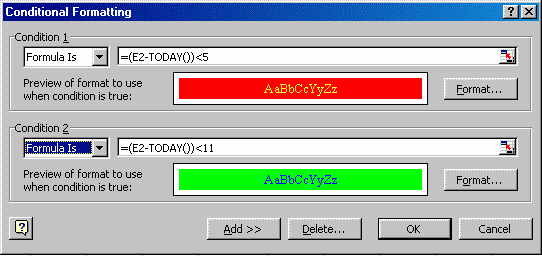
=(E2-TODAY())<6(Note if your first date is not in E2, change the E2 to the cell that you are in) - Click the Format button near the bottom of the conditional formatting dialog box.
- In the middle of the Font tab is a color dropdown. Pick Red. Or - pick yellow and on the patterns tab pick Red. That will make them really stand out. Click OK to return to the Conditional Formatting dialog.
The above steps will make due dates within 5 days of today turn red. While you are still in the conditional formatting dialog box, do these steps:
- Click the Add>> button at the bottom of the dialog box and a new Condition 2 will show up.
- Change "Cell Value Is" to "Formula Is"
- Enter a formula
=(E2-TODAY())<11 - Click the Format button and choose blue font, and a green pattern. Click OK to close the Format Cells dialog.
- Your Conditional Formatting Dialog should look like this one. Click OK.
We are almost there. Once you go through all of these steps to get the conditional format set up for the first cell, it is easy to use the Paste Special feature to copy the formats to your entire range of dates. When you Paste Special - Formats, the conditional formatting will be copied as well.
- Select the cell to which you added the conditonal formatting. In this example, it is E2.
- From the menu, choose Edit - Copy.
- Highlight all the other dates in your data - E3:E200. IF you are going to be adding more data, feel free to highlight some extra rows.
- From the menu, choose Edit - Paste Special...
- In the Paste Special dialog, choose the 4th entry in the left column - Formats.
- Click OK.
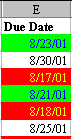
This will copy the conditional formatting to all of the cells that you selected. Note that it will copy borders and number formats as well, so you may have to readjust your borders after doing this operation.
Notes:
- There is a limit of 3 conditional formats that can be applied to any cell. Including the default formatting which applies to the cells that meet none of the conditions, this means that you can automatically have up to 4 formats apply to a cell.
- If you need to extend this to more than 4 formats, you will have to write a macro in VBA. The macro will be relatively slow, as it will have to update all of the cells after you make any change to the spreadsheet. You can also hire an Excel consultant to do that.
- The most difficult part of setting up conditional formatting is typing the formula in the formula box. Remember to always start the formula with an equal sign. There could be an entire chapter in the book devoted to the different formulas that can be typed into this box. It is possible to enter formulas which rely entirely on other cells.
- If you exit the formula entry and go back later to edit the formula, Excel has a nasty habit of interpreting the backspace character as an attempt to point to cells. This will always change your formula to the wrong thing. Hit Escape to return to the original formula. It is useful to highlight the errant text with the mouse and then type more.