
Run A Macro From An Icon
May 12, 2021 - by Bill Jelen
Challenge: You want an easy way to run a macro, and you don’t especially like the options presented in “Run a Macro from a Button.” Can you run a macro from an icon on a toolbar?
Solution: The process of setting up a macro to run from a toolbar icon changed dramatically between Excel 2003 and Excel 2007. You have far more options in Excel 2003.
For Excel 2007
In Excel 2007, the only non-programmatic method for adding a macro button to a toolbar is to add a button to the Quick Access toolbar. Follow these steps:
- Right-click anywhere in the ribbon and choose Customize Quick Access Toolbar. Excel opens the Customize section of the Excel Options dialog.
- Open the Choose Commands From dropdown and select the fourth item, Macros.
- Choose a macro from the left list box.
- Press the Add>> button in the center of the dialog.
- Use the up or down arrow button on the right side of the dialog to rearrange the icon within the ribbon, if desired (Figure 114).
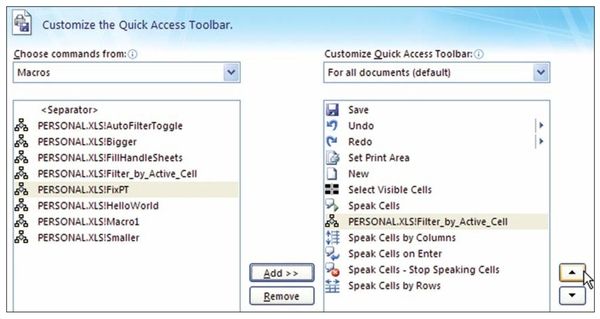
Figure 114. You can add an icon to the Quick Access toolbar and adjust its location. - By default, every macro starts out with an identical flowchart icon. To change the icon, click the Modify button, which appears below the right list box. There are 181 icons available (Figure 115). Choose one that will remind you of the action in the macro. Change the display name to something friendlier. This name will be displayed when you hover over the icon in the Quick Access toolbar.
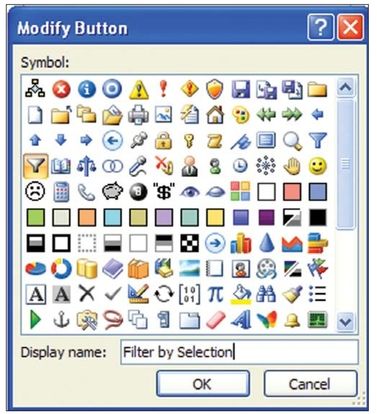
Figure 115. You customize the icon from this selection of icons. - Click OK to close the Excel Options dialog. The new icon appears in the Quick Access toolbar, as shown in Figure 116.

Tip: There is one bit of new functionality in Excel 2007: You can add to the Quick Access toolbar an icon that appears only when a particular workbook is open. To add an icon for one workbook, use the top-right dropdown in the Customize dialog. Change the setting from For All Documents (Default) to For <workbook name>.
For Excel 2003
Excel 2003 and prior versions offer more options for adding icons to your toolbars. The icon can be added to any toolbar or even to a new toolbar. (See “Run a Macro from a Button” on page 102). You can use a selection of default icons, draw your own icon, or even copy an icon from another application. Here’s how:
- Right-click any toolbar and choose Customize or select Tools, Customize.
- Select the Commands tab in the Customize dialog.
- Scroll down in the left list box to almost the end. Choose Macros, the third item from the end of the left list box. The right list box offers two icons: a smiley face and an icon with nothing. Even if you hate the smiley face, use it for now.
- Drag the smiley face icon from the right list box and drop it in the desired location on any toolbar or menu. Figure 117 shows the new icon being added to the Filter fly-out on the Data menu.
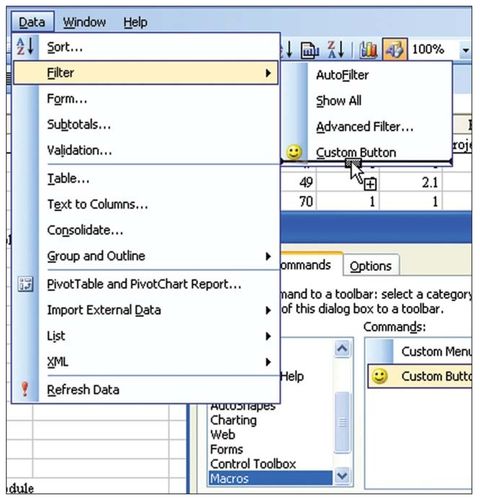
Figure 117. You can drag the smiley face to any existing toolbar or menu. - Keep the Customize dialog box open. Find your new icon on the menu or toolbar. Right-click the icon or click it and choose Modify Selection in the Customize dialog. From the menu that appears, adjust the settings in step 6 and optionally follow any of steps 7 through 11.
- From the bottom of the menu, choose Assign Macro. Choose the appropriate macro and click OK.
- Choose Change Button Image and select one of the 48 default images instead of the smiley face (Figure 118).
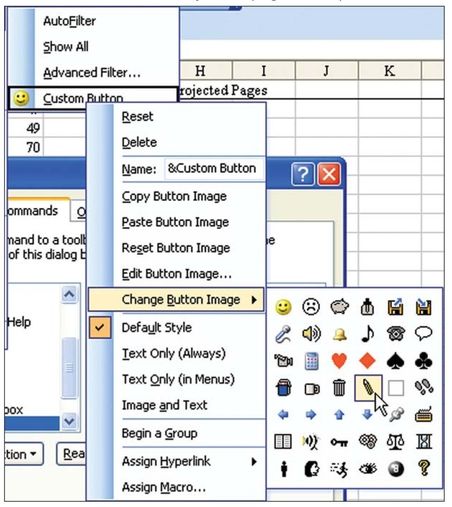
Figure 118. You are not stuck with the smiley face. - Type a new name for the button. This name will appear in menus and will appear as the ToolTip when the icon is in a toolbar.
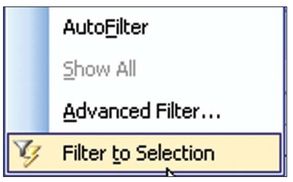
Tip: If your icon is in a menu, add a shortcut key by preceding one letter in the name with an ampersand. For the menu shown in Figure 119, for example, the name is Filter &to Selection. This causes the t in to to be underlined, and it makes the command sequence to access the new button Alt+D+F+T (D opens to Data menu, Filter opens the Filter menu, and T selects Filter to Selection).
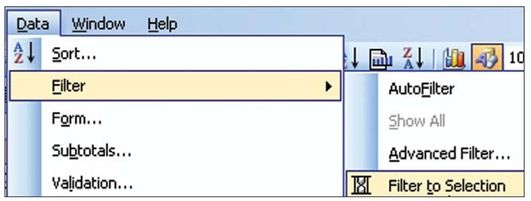
Figure 119. In menus, you can specify one letter to have an accelerator key. - If desired, use the Begin a Group menu item to tell Excel to insert a separator before the menu item.
- If you have way too much time on your hands, choose Edit Button Image and create any icon that fits in a 16-by-16 grid (Figure 120). Before you try this, see if another Office application offers the icon you need and follow the instructions below for copying an icon from another Office application.
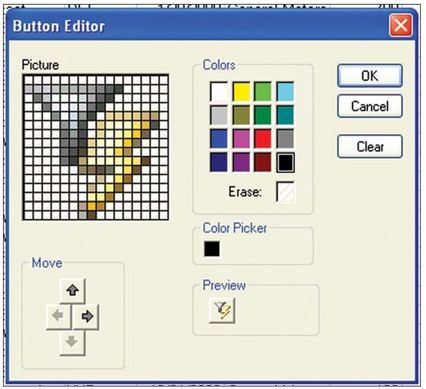
Figure 120. In Excel 2003 and earlier, you can edit to create your own custom icons. - By default, a custom menu item appears with an image and text. A custom toolbar item appears with only an image. You can override this style by using the Text Only or Image and Text settings in the menu.
Copying Icons from Other Office Applications
Rather than create your own icon using the Button editor, as shown in Figure 120, see if another application already has the icon. For example, the idea for Filter to Selection came from Access. It is likely that Access already has an icon called Filter to Selection. If so, you can copy the icon from one Office application to Excel. Follow these steps:
- Keep Excel open and open Access (or Word or PowerPoint).
- In Access (or Word or PowerPoint), find the Filter to Selection icon, which appears only when you are viewing a table. Finding the icon might require a few steps. If you don’t have an Access table, use File, Import to import an Excel worksheet into a table. Then double-click the table to view it in Data Sheet mode. The desired icon now appears on the Table Datasheet toolbar.
- Right-click the toolbar and choose Customize.
- While the Customize dialog is displayed, right-click the desired icon and choose Copy Button Image.
- Switch back to Excel.
- Choose Tools, Customize.
- Right-click the desired icon and choose Paste Button Image. A new menu item is added, with a shortcut key and a professional-looking icon. As shown in Figure 121, this item looks like it is part of the core Excel product.
Summary: Excel 2003 is better than Excel 2007 for adding custom menu items.
Title Photo: Harpal Singh on Unsplash
This article is an excerpt from Excel Gurus Gone Wild.