
Slicer Selections in Title
May 14, 2018 - by Bill Jelen

Joy attended my Houston Power Excel seminar and asked if there was a way to show the items selected in a slicer in a cell above the pivot table.
I love slicers, because they can show you all of the items selected.
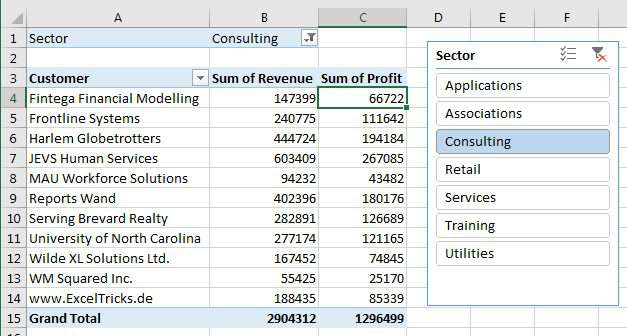
Say that you only select one item from the slicer or Report Filter. If you put the Sector field in the Report Filter, you have a great title in B1 showing what is selected.
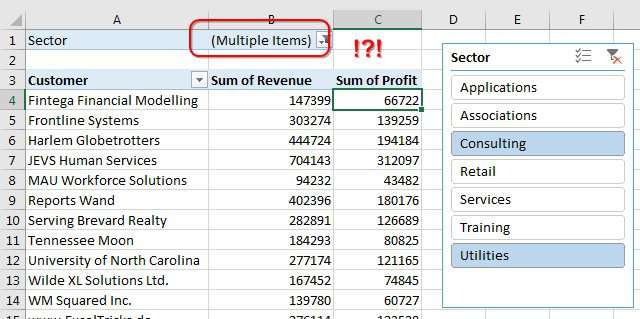
But as soon as you select 2 or more items from the slicer, then the title becomes (Multiple Items). That is not helpful.
So - here is the solution that I offered to Joy in Houston. Remove Sector from the Filter area. Select the entire pivot table. Copy with Ctrl + C.

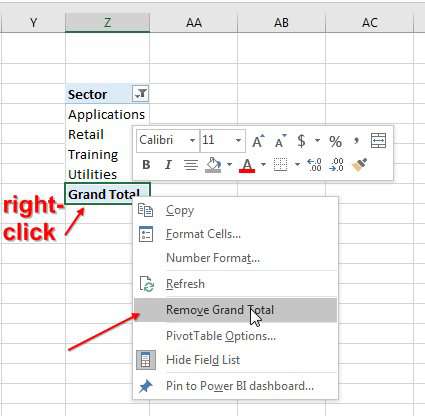
Move far to the right and paste a copy of your pivot table. You want this pivot table to be outside of the print area and outside of one screen of data. I am pasting to Z3.,
Remove all fields from the new pivot table. Take whatever is in your slicer and move that field to the Rows area.
Your pivot table will consist of a heading, a list of the selected Sectors, and a cell that says Grand Total. Right-click the Grand Total and Remove Grand Total.
Go back to cell A1. Use the formula =TEXTJOIN(", ",True,Z4:Z20). This new function was introduced in February 2017 for Office 365. The second argument is called Ignore Empty. Putting True there will prevent a bunch of extra commas appearing at the end of your list.
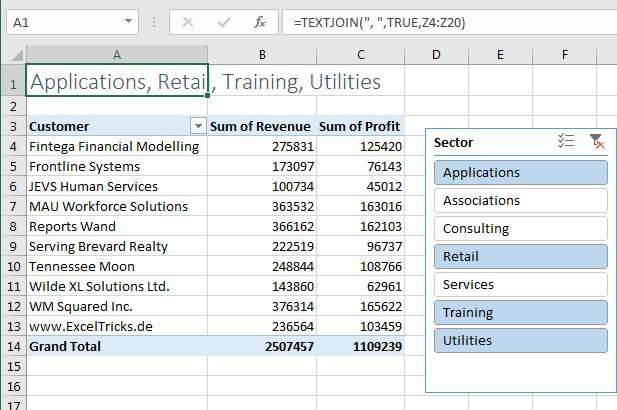
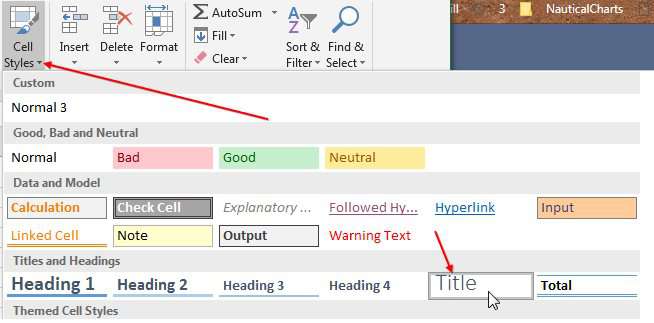
In the figure above, I applied the Title style to cell A1. This is found in the Cell Styles gallery.
Watch Video
Video Transcript
Learn Excel from MrExcel Podcast, Episode 2202: Slicer Selections in the Title.
Great question today that I picked up in my Houston Power Excel seminar from Joy that was down there for the Texas Council of the IMA. Joy has a Pivot Table-- so we'll create a Pivot Table here, Insert, PivotTable, Okay. I don't know, build some sort of a Pivot Table here, maybe Customers going down the left-hand side, Revenue, Profit, something like that. And Joy has a Slicer-- so Insert, Slicer, choose a Slicer by Cector, click OK. And Joy chooses a few things from the Slicer, and then here's the question: Joy wants to take these selected items and put them as the Title up in Cell A1.
Okay, a comment from Bart on Episode 2198, would solve this if we had just a single item selected. And Bart points out what we can do is, take the Sector field and drag it to Filters, and then if you have just one item selected, bingo! You have the title. But, going back to Excel 2007, this horrible word of multiple items, what is up with that? That's not useful at all. So it doesn't work when you have multiple items selected.
So here's my workaround that's going to get us all the Sectors: First thing I want to do, is I want to create a second Pivot Table outside of view-- just, like, over there in Column Z where no one's going to see it-- and that pivot table has to be tied to this Slicer. And so my cheap and dirty way of doing that is to copy the Pivot Table, and just come way out here to Column Z, and paste. Alright. And by copying and pasting, I don't have to worry about coming in here to Analyze and Filter Connections, and choosing this Tied to Sector-- it's already tied to sector, you know, so that's faster. And what we're going to do in this Pivot Table is we're going to put whatever is in the Slicer in the rows area. That's the only field that we're going to have here. Get rid of all the other fields-- all the other fields go away. And, most importantly, we're going to get rid of the word "Grand Total"-- so right-click and Remove Grand Total.
So, what happens right now, I have two things selected, and of course if I choose more-- so I'll come back here and hold down the Ctrl key or use the Multi Select and select multiple items-- then we'll go back and look at that Pivot Table far out there in Column Z. I now have a list of all four items. Alright? So we're going to know that starting here in Z4, for some unknown length, is going to be a list of all the items selected. So, we're going to come back here to our Title cell and use that great new function that came along in February of 2007-- =TEXTJOIN. Between each item I want to put comma, space, that's in quotes, and then the most important part here to make this work, ignore empty, yes, ignore empty (=TEXTJOIN(", ",True,). And then, where is our data? I'll go from here, let's just cruise over here, we'll start from the very first cell and just down however many we could possibly ever have, like that, press ENTER. And now, up in Cell A1-- we'll Cell Styles and choose the title-- as I choose from the Slicer, it is automatically updating. If I choose two or three, no worries, it'll put commas in between; if I choose just one, it's fine; if I choose them all, it'll put them all. Alright.
So, by using TEXTJOIN and that second Pivot Table out there on the right, great way to get the Slicer selections showing up as a Title and avoiding the whole multiple items bug-- it's a bug, they did it by design, I think it was horrible back in Excel 2007.
Now this trick and many other tricks like it are in my book, MrExcel LIVe, The 54 Greatest Excel Tips of All Time.
Wrap-up from today's Episode: Joy in Houston-- can I have the information selected in the slicer as a Title above the Pivot Table? We drag the slicer to the Report Filter, but if you choose multiple items, then you get that horrible Title of Multiple Items in parentheses. I mean, what are the multiple items? Slicers let you see the items, but if you don't want to include the Slicer in your Print Range, you can build your first Pivot Table, add a Slicer, copy that Pivot Table and paste this to the right-- far off to the right where no one will be able to see it. That'll make the Pivot Table automatically connect it to the slicer. Put only the Slicer field in rows of that second Pivot Table, delete the Grand Total row, and use TEXTJOIN, saying, Ignore the blanks, to put all the Slicer Selections up in a cell.
To download the workbook from today's video, visit the URL in the YouTube description, also there are lists of my upcoming seminars-- would love to see you at one of my Excel seminars.
I want to thank Joy for asking me that question in Houston, and I want to thank you for stopping by. We'll see you next time for another netcast from MrExcel.
Download Excel File
To download the excel file: slicer-selections-in-title.xlsx
I love discovering new techniques in my Power Excel seminars. For a list of upcoming events, see Upcoming Power Excel Seminars.
Excel Thought Of the Day
I've asked my Excel Master friends for their advice about Excel. Today's thought to ponder:
"Garbage in, insight out."
Title Photo: Matthew Cabret on Unsplash