
Mail Merge to PDF from Excel
December 29, 2017 - by Bill Jelen

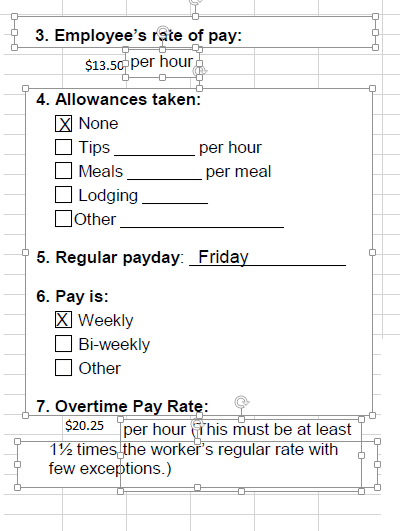
On January 1, 2018, the minimum wage in New York City increases to $13.50. This means that millions of copies of form LS 54S or form LS54 – Notice and Acknowledgement of Pay Rate must be sent to workers. The State of New York provides a blank copy of this form as a password-protected PDF. How can you use Excel to prepare hundreds of such documents for your employees?
While the process for doing a mail merge from Excel to Word has been documented at MrExcel (https://www.youtube.com/watch?v=2QPxSMDk0ug ), can you do a mail merge from Excel to a PDF?
I was surprised that the best solution to this process is using Adobe InDesign! But first, let me recap my two failed attempts:
-
Failed Attempt 1: I tried replicating form LS54 in Excel using a series of Screen Clippings to wrap around the cells that would contain the fields in Excel. This took forever, and when printed, the screen clippings looked horrible.
Failed Attempt 1 -
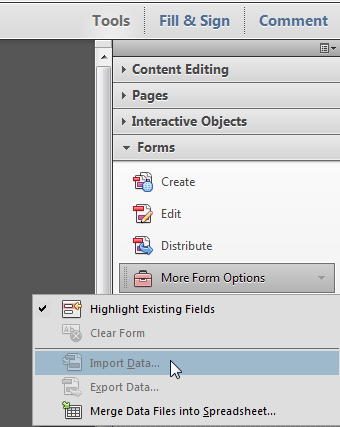
Failed Attempt 2: Use Adobe Acrobat. You would think the full version of Acrobat would offer a way to populate a form using a mail merge. There is a an Import Data option under Tools, Forms, More Form Options. I wasted the time to add fields to the PDF, imported the spreadsheet, and then was disappointed to find out that I could only fill one form at a time. Choose Row 2 and I could print the first employee. But then I would have to choose Row 3, Print, Choose Row 4, Print, Row 5, Print, and this is never going to work for 750 employees.
Failed Attempt 2
Solving the Problem using Adobe InDesign
Here at MrExcel, we publish books under the Holy Macro! Books imprint. We subscribe to the Adobe Creative Cloud suite, which gives us Photoshop, Lightroom, Acrobat, and something called InDesign. Check around at your company, it is likely that someone in your marketing or creative departments already have a subscription to Adobe Indesign.
I was able to solve the problem in less than an hour using InDesign. I’ve documented the steps here to simplify your process.
-
Part 1: Convert the password protected PDF to a graphic
- Download the Form LS54S from labor.ny.gov at Form LS54S
- (Optional) Curse at the state for password protecting the PDF
- Convert the PDF to an Image. If you have Acrobat, use File, Export To, Image, JPEG. If you don’t, you can use the Snipping Tool in Windows to capture the form. Just make sure Acrobat Reader is showing the form at 100%.
-
Part 2: Build the document in InDesign
-
Open Adobe InDesign. Choose File, New, Document. The first step in the New Document dialog is to click the second icon under Orientation to make your document landscape. Change the Units to Inches, Width to 11, Height to 8.5. Change the top margin to 0 and InDesign will make all margins 0.
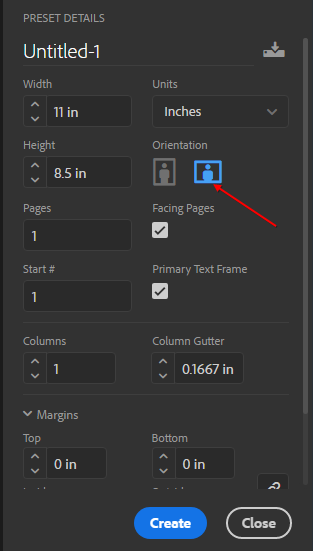
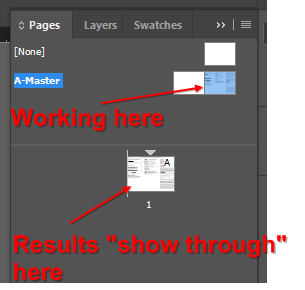
Indesign Preset Details This next part is tricky but important. You are seeing Page 1 of a 1 page document. You would think that you are supposed to build your form there. But you are not! Press F12 to open the Pages panel. You will see Page 1, but above it are two Master pages called [None] and [A-Master]. You need to build the form on the right-side of the A-Master page. This is super important! Do not build the form on the left side of A-Master and do not build the form on Page 1.
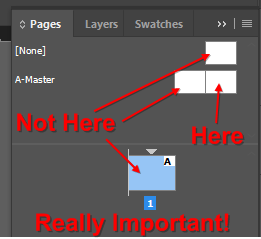
Indesign Pages Panel - Double click on the right side of A-Master in the Pages Panel
-
From Windows Explorer, drag the JPG from step 3 and drop it on the Paste Board that is outside of the Master Page. If you are new to InDesign, you would think you should drag-and-drop the image *inside the page*, but that would be wrong. I am sharing a trick that I learned from Anne Marie “Her Geekness” Concepcion. If you ever need to become a master at InDesign, you should hire Anne Marie. When you drop the image on the Master Page, you can not get to the resize handles. Instead, drop the image just outside the Master Page, You now have access to the resize handles. Resize the document to fit the page by Holding down Shift while you drag the top-left resize handle down. Once the document is slightly smaller than the page, drag it over the right side master page. Don’t freak out that you’ve cut off half of the text!
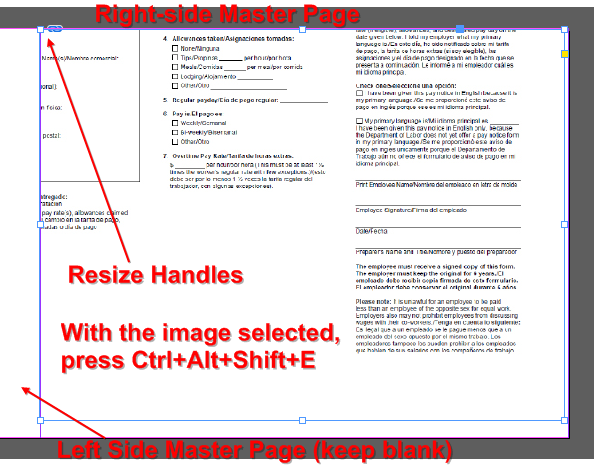
Indesign Master Page - Press my all-time favorite keyboard shortcut: Ctrl + Alt + Shift + E. This will make the whole image fit inside the newly resized frame. I know dozens of shortcut keys in Excel. I only know two shortcut keys in InDesign and Ctrl + Alt + Shift + E is one of them. It completely intimidates me that InDesign might possibly have 25 other shortcut keys like Ctrl + Alt + Shift + A through Ctrl + Alt + Shift + Z!
-
-
Part 3: Fill in the Fixed Fields
There are some fields on the form that will be the same for all employees. For example, the company name might be the same for everyone. Here is how you add some text to the Master Page in InDesign.
-
Press the F key to start Frame mode. Using your mouse, draw a rectangle where you want the fixed text to appear. Initially, this frame will have an X through it.

Indesign Frame Mode - Right-click your newly drawn frame. Half way down the long context menu, choose Context, Text.
- Press the T key to enter Text Entry mode
-
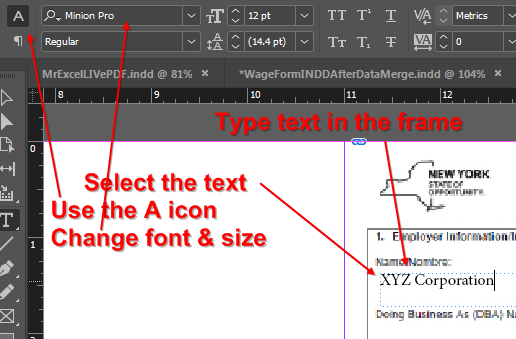
Click inside the box and type the fixed text. If you need to change the font, select the text, and use the “A” icon above your screen to reveal the character tools.
Indesign Font Name and Size -
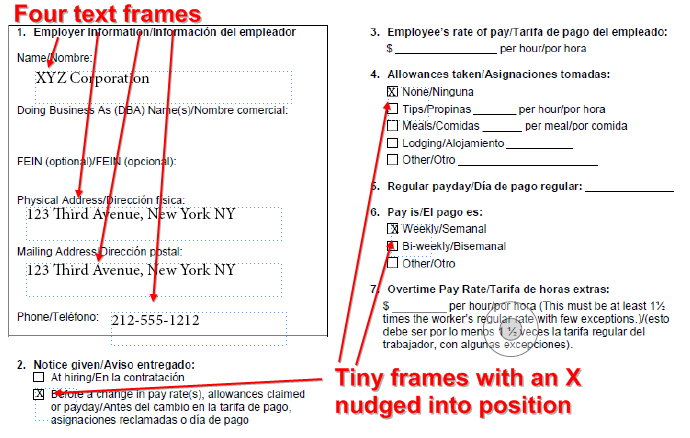
Repeat steps 8 through 11 for all of the other fields that need to be constant on all forms. This is monotonous. Getting a tiny frame with a small 9-point “X” lined up with the checkboxes is not fun, but it is do-able. If you need to move a frame or resize the frame, you will need to select it with the first arrow tool on the left. It is called a Selection Tool (as opposed to the less-useful Direct Selection Tool which is the second arrow in the box).

Indesign Selection Tool
Pro Tip #1: Select the first box. Ctrl + C to copy. Ctrl + V to paste a new box in the middle of the page. Drag the new box in to position. This is super-useful once you get a tiny X for the checkboxes.
Pro Tip #2:It is tough to use the mouse to get the “X” in the right position. Once the frame is selected, use the arrow keys on the keyboard to nudge the frame in to position.
Pro Tip #3: All Images in InDesign start out looking horrible. It is a feature, not a bug! Think about a book. Power Excel 2017 With MrExcel has 1400 images. The computer would bog down if they tried to display all 1400 images in high resolution. Your document has one image and you can probably afford to show the image at high resolution. Select the image by clicking in some white space on the form. Right-click and choose Display Performance, High Quality Display. Presto! The image become sharp.
Indesign Pro Tips -
-
Part 4: Fill in the Data in Excel
Holy Spreadsheet! It took me this long to get to the Excel part of the technique.
- Put simple one-word headings in row 1. Format all currency fields as currency or you will find $13.50 appears as 13.5 in the merged PDF. I realize there is already a dollar sign on the form, but $ $13.50 looks better than $ 13.5.
- Use File, Save As. Save the document as an Excel file so you can edit it later.
- Use File, Save As. Save the document as Text (Tab delimited) (*.txt). Make sure to remember the path and file name so you can find it later. Close the file in Excel or you will get an error message in step 17.
-
Part 5: Back to InDesign to Add Form Fields
-
From the InDesign menu, choose Window, Utilities, Data Merge. A tiny Data Merge window will appear floating somewhere above InDesign. Every little floating panel in InDesign has a whole bunch of useful commands hidden behind what they call the Panel Menu. Here is a picture of the Panel Menu icon:
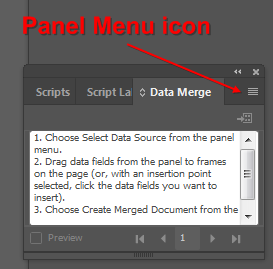
Indesign Data Merge - Open the Panel Menu on the Data Merge. Choose Select Data Source. Browse to and select the .TXT file from Step 15. The Data Merge Panel now shows the field names from row 1 of your spreadsheet. In a drag-and-drop world, you would think you could drag these fields on to your form, but you can’t. Instead, repeat steps 8 & 9 to draw new frames where you want those fields to go. Make the frames nice and wide in case one of your employees is John Jacob Jinglebells III. Particularly for the LS-54S pay and overtime fields, you might need to change to 10 point to allow the frame to fit.
-
Click inside the empty frame for Name. In the Data Merge panel, click on Name. Presto! <<Name>> appears in the frame. Repeat for Wage and OT.
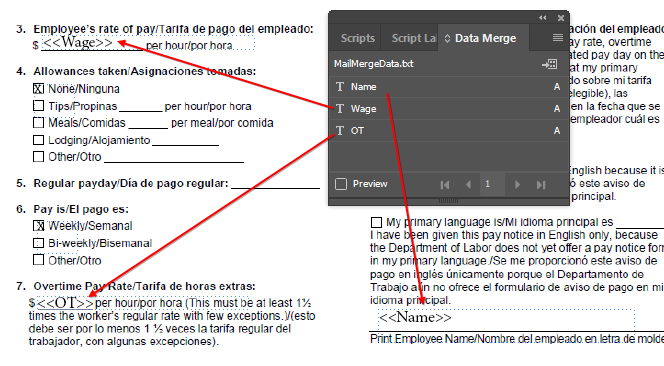
Indesign Data Merge Panel - This step is optional, but worth the sixty seconds. Click the Preview box at the bottom left of the Data Merge panel. You will see data from the first record. Use the Left and Right arrow icons at the bottom of the Data Merge panel to see the next record.
- Save the InDesign file before you do the merge. I’ve saved my document at this point and you can download it from here.
Just to recap, if you look over in the Pages panel, you’ve been doing all of this work on the right side of the A-Master page. But you can see from the thumbnail that everything on the Master page is showing through on Page 1 of your document.
Indesign Pages Panel -
-
Part 6: Finally, the Mail Merge
-
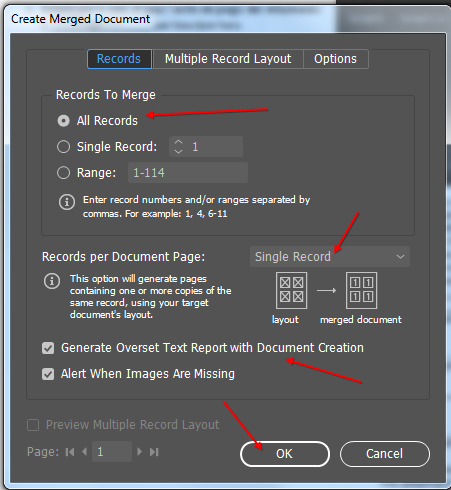
There is an icon near the top of the Data Merge panel that looks like the number 4 side of a die. That is the symbol for Create Merged Document. Click it.

Indesign Create Merged Document -
All of the settings in Create Merged Document are correct. Click OK.
Indesign Create Merged Document Dialog - You will get one of two messages. Either: “No Overset Text Was Generated” or “You Have Overset Text In these Records”.
In InDesign, the words “Overset Text” means you have more characters than will fit in a text frame. I haven’t found any equivalent of Excel’s Shrink to Fit. If they say that you have overset text on record 450, go to page 450 in the Pages Panel and see that you have an employee with a really long name. Go back to the right side of the A-Master page and resize the frame for that field.
At this point, you will have a large document in InDesign. In my case, I have 114 pages because I had 114 records in the Excel file. Click on any page in the Pages panel to see that page with the data filled in.
Some tips: The Data Merge Panel Menu offers an Update Data Source command. If you change the underlying Excel file and save as a new text file, use the command to get the changes. You will have to repeat step 21 to re-merge.
-
-
Part 7: Export to a PDF so you can Print
-
From the File menu, choose Adobe PDF Presets, [High Quality Print]. Choose a file path and name. Accept all of the thousands of settings in the Export Adobe PDF dialog. Click OK
One concluding note here: In real life, we had 751 employees. I put each employee in the file twice so we could print two copies for each employee and have them collated. The resulting 1502 page PDF was miraculously only 2.48 MB in size! Somehow, the wizards at Adobe have managed to save one copy of the image and re-used it over and over. My misguided first attempt to do the mail merge using Excel produced a lousy-looking 150MB PDF file that could never be e-mailed.
If you can’t find a copy of InDesign or these steps seem too intimidating, hire an Excel consultant to do the mail merge to PDF for you.
-