
Recording a Macro in Excel
October 01, 2004
These are my show notes from my appearance on Episode 33 of Call for Help on TechTV Canada.
VBA Macro Recorder
Every copy of Excel sold since 1995 includes the incredibly powerful Visual Basic for Applications (VBA) hiding behind the cells. If you have Excel, you have VBA.
VBA allows you to automate anything that you can do in Excel, plus do more things that are not generally possible in Excel.
Luckily for us, Microsoft included a macro recorder with Excel. This lets you write VBA code without being a programmer. Unfortunately, the Macro Recorder is flawed. It will not produce code that will work every time. The macro recorder will get you close, but in many cases you need to fix up the code a bit in order to have it reliably work. In other cases, you need to know when to use Relative Recording in order to make the macro work.
Tracy Syrstad and I wrote VBA and Macros Microsoft Excel 2016 in order to help you understand the limitations of recorded code and to teach you how to fix recorded code into something that will work everytime.
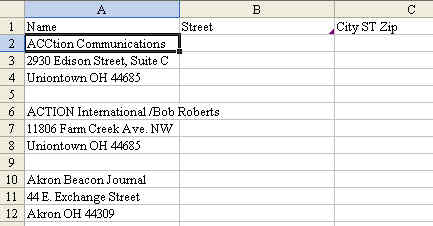
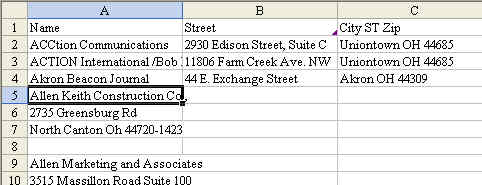
On the show, I demonstrated the process of recording a macro that will work perfectly if you know how to use the Relative Reference button. Someone had given me an Excel worksheet with hundreds of names and addresses. They wanted mailing labels. If you've ever used the Microsoft Word mail merge feature, you know that you need each field in a new column in the worksheet. Instead, this particular worksheet had the data going down column A.
The process to fix a single label is pretty tedious.
- Start with the cell pointer on the name in column A.
- Hit the down arrow to move to the address
- Ctrl+x to cut
- Up arrow, right arrow to move to column B next to the name
- Ctrl+v to paste
- Down arrow twice, left arrow once to move to the city
- Ctrl+x to cut
- Up arrow twice, right arrow trice
- Ctrl+v to paste
- Left arrow twice, down arrow once to move to the now blank row.
- Hold down shift key while you hit the down arrow twice
- Alt+edr to delete the blank rows
- Up arrow & down arrow to select just the name again.
Here is the animation showing these steps:

Setting up Excel to Allow Macros
Although every copy of Excel contains VBA, by default, Microsoft turns off the ability to run macros. You need to do a one-time adjustment to allow macros to run. Open Excel. From the menu, select Tools > Macro > Security. If you macro security level is currently set to high, change it to Medium.

Preparing to Record the Macro
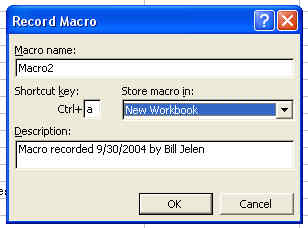
Think about the steps necessary to achieve the task. You want to make sure that you start with the cell pointer on a name and end with it on the next name. This will allow you to repeatedly run the macro many times. When you have the steps ready to go, turn on the macro recorder. From the menu, select Tools > Macro > Record New Macro.

If you will be running this macro for many days, you should give the macro a useful name. If it is a one-time macro to automate a one-time task, then leaving the Macro name as Macro1 is probably fine. The important field here is the shortcut key field. If you are creating a macro for one-time use, assign the macro to a shortcut key such as Ctrl+a - it is pretty easy to hit Ctrl+a repeatedly since the keys are close to each other. If you are going to create a macro that you will be using every day, then you want to assign the macro to a key that is not already an important shortcut key combination. Ctrl+j or Ctrl+k are good choices.
One-time use macros should be stored in ThisWorkbook. If you need to use the macro repeatedly on many different workbooks, then you can store the macro in the Personal Macro Workbook.
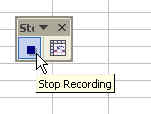
You are now presented with the tiniest toolbar in all of Excel; the Stop Recording Toolbar. It has just two icons and looks like this:
If this toolbar gets in your way, do not hit the X to close it. Instead, grab the blue bar and drag the toolbar to a new location. The act of moving the toolbar is not recorded in the macro. If you do accidently close the toolbar, get it back with View > Toolbars > Stop Recording. This action, however, will be recorded.
The first button on the toolbar is the "Stop Recording" button. This is self-explanatory. When you are done recording the macro, press the stop recording toolbar.
The more important (and seldom understood) button is the "Relative Reference" button.
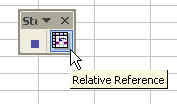
In our current example, you must press the Relative Reference button before you begin. If you record a macro with Relative References turned on, Excel will record steps like this:
- Move one cell down
- Cut the current cell
- Move one cell up
- Move one cell right
- Paste
- etc.
If you would instead record the macro without relative references, the macro would record these steps:
- Move to cell A4
- Cut cell A4
- Move to cell A3
- Move to cell B3
- Paste to cell B3
- etc.
This would be horribly wrong - we need the macro to work on cells that are 1 and 2 cells from the starting point of the macro. As you run the macro over and over, the starting point will be row 4, row 5, row 6, etc. Recording the macro without relative references turned on would have the macro always run on row 3 as the starting point.
Follow these steps:
- Choose the Relative Reference Button on the Stop Recording Toolbar
- The cell pointer should already be on a name in column A.
- Hit the down arrow to move to the address
- Ctrl+x to cut
- Up arrow, right arrow to move to column B next to the name
- Ctrl+v to paste
- Down arrow twice, left arrow once to move to the city
- Ctrl+x to cut
- Up arrow twice, right arrow trice
- Ctrl+v to paste
- Left arrow twice, down arrow once to move to the now blank row.
- Hold down shift key while you hit the down arrow twice
- Alt+edr to delete the blank rows
- Up arrow & down arrow to select the next name in the list.
- Hit the Stop Recording toolbar
- Save the workbook
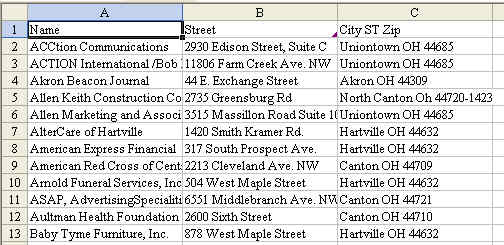
- Test the macro by hitting the shortcut key assigned above. It should perfectly fix the next name in the list
Once you see that the macro works as desired, you can hold down Ctrl+a to rapidly fix a few names per second. The entire list of 500 names can be fixed in a minute or two.
Bonus Tip - Not on the Show
You can easily wrap the macro in a simple loop in order to have it fix all 500 names without you having to hit Ctrl+a several hundred times.
Hit the Alt+F11 key to open the macro editor.
If you don't see the Project - VBAProject pane, hit Ctrl+r.

Right-click Module1 and choose View Code. You will see code that looks like this:
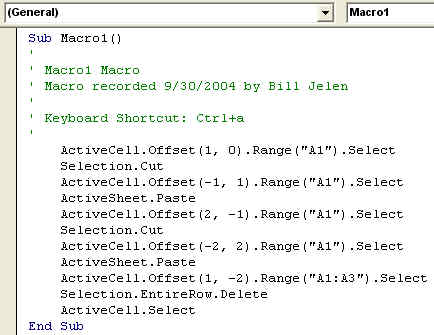
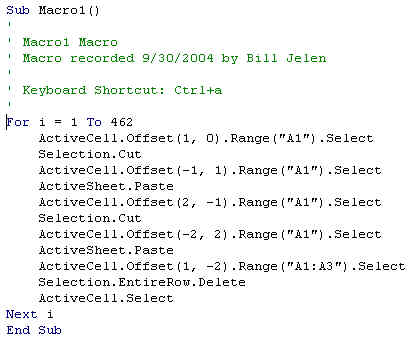
Now, you don't have to understand what this code does, but you do know that we want to run everything in that macro once for every name that we have. If you know that there are 462 names, then you can add 2 lines in order to run the code 462 times. At the top of the macro, insert a new line with the words "For i = 1 to 462". At the bottom of the macro, insert a line that says "Next i". This tells VBA to run the code inside 462 times.
Conclusion
After this simple macro, I showed an example on the show of a very complex macro. This macro created pivot tables and charts for 46 departments of a company. This report used to take 40 hours every month. The VBA macro now runs and creates all 46 reports in less than 2 minutes.
The book VBA and Macros Microsoft Excel 2016 will walk you up the learning curve so you can get from recording simple macros like this one to running very complex reports that can save you hundreds of hours per year. Of course, If you don't want to learn VBA, hire an Excel Consultant to design a report for you.